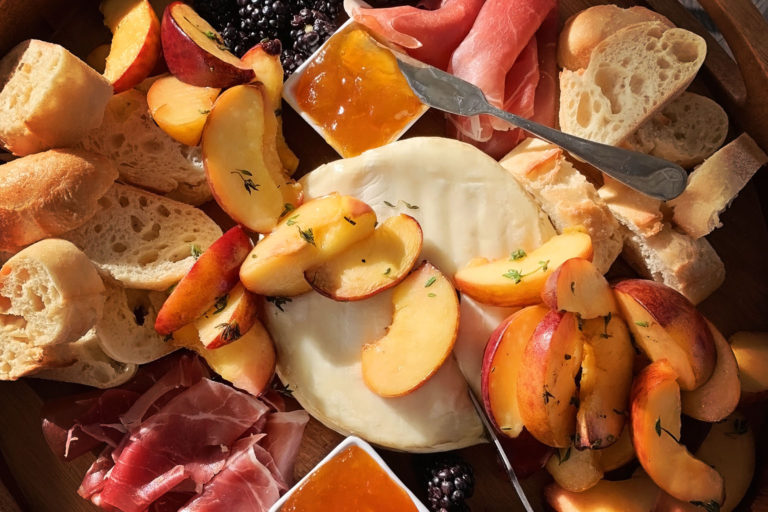
Tag

grazing table

Browsing

Cheese boards are having a big moment right now and I’m here for it. I love a good cheese board, charcuterie platter, or grazing table. This grilled peaches and brie summer cheese board is not only a showstopping party dish, but also so easy to put together that it works for a nice weeknight meal!

This post is not sponsored by any of the companies or products mentioned below. There are affiliate links within this post. Purchases made from affiliate links help support this blog without any additional cost to the buyer. Thank you for supporting this blog as it allows me the opportunity to create new content!

I am a part of a Facebook group in which group members are always sharing photos of everything from super simple cheese boards to extravagant platters. I think that this type of dining works so well these days because people are all on different diets and because they can be put together without a ton of cooking skills.

This cheese board was inspired by an email or pamphlet I received from Fred Meyer’s with a recipe for Cedar Plank Grilled Peaches and Brie. I have linked the recipe here and you are welcome to follow it as it is very close to what mine ended up being, but I did make a couple of small changes that I feel like made a nice difference.

I wanted to make a the grilled brie and peaches to go with a few small items to create a nice charcuterie board or cheese board. However, as I was serving it as dinner, I also served a vegetable platter which is why you are seeing the artichokes on the grill in pictures. (I’ll share the vegetable platter in another post.)

Cedar Plank Grilled Brie and Peaches

This is the most labor intensive part of this whole platter and it takes around 20 minutes aside from prepping your cedar plank. Cedar planks are going to be important for two reasons: 1) to impart a nice smokey flavor to your dish and 2) to prevent the peaches or brie from just melting right into the grill. You’ll want to make sure your cedar plank gets a good soak in water so that it doesn’t just burn on the grill.

Grilling brie and peaches on a cedar plank prevents leaking.

Cedar Plank Grilled Brie and Peaches Supplies/Ingredients:

  • 1 Cedar Plank *(Affiliate link) soaked in water for approximately 2 hours
  • 1 wheel of brie
  • 2-3 ripe peaches (not too ripe as they will just get mushy)
  • 1/4 cup honey + extra for drizzling after
  • 2 tablespoons olive oil
  • Fresh thyme- approximately 1/4 teaspoon
  • Salt & Pepper to taste (I used sea salt flakes and fresh ground pepper)
  • Grill (an alternative is using your oven and broiler but again, it is essential that your cedar plank has been properly soaked)

Cedar Plank Grilled Brie and Peaches Supplies/Ingredients:

  1. Soak your cedar plank in water. I put mine on a baking dish and cover in water for two hours.
  2. Heat grill (or oven) to approximately 350 degrees F or medium heat.
  3. Slice peaches, discarding pit.
  4. Mix together olive oil, thyme, and honey in a bowl.
  5. Toss your peaches in the olive oil and honey mixture. Remove from bowl and set aside.
  6. Brush your brie with the remaining olive oil and honey mixture.
  7. Place the brie and peaches on the cedar plank and place on grill. If there isn’t room for all of the peaches and brie on the plank then grill your peaches first, and then move to your brie.
  8. Cover the lid of the grill and let cook for approximately 10 to 12 minutes. The cheese will be warm and melted (it will still hold its shape with the rind, but you should be able to see that it might be starting to seep through a bit. The peaches should be warmed through and softened a bit. If using the oven, you can put the broiler on for a moment at the end to help caramelize the peaches a bit.
  9. Place on platter, salt & pepper to taste, drizzle with some honey, and serve!

How to serve grilled peaches and brie

You can do so many different things in serving this dish starting with just adding some grilled bread or tasty crackers and calling it a day. I wanted to add a bit more bulk to the dish so I added prosciutto, blackberries, apricot jam* (affiliate link), and sliced baguette.

What other summer fruit or vegetables would pair well with grilled brie? Share your thoughts in the comments below or @ me @JenniBost!

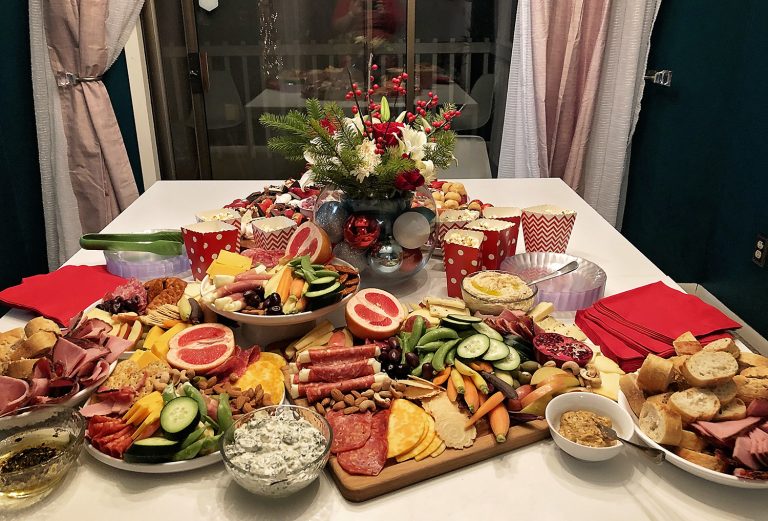
By now you’ve probably seen your fair share of charcuterie boards, cheese platters, and vegetable displays. Over the past few years, I’ve noticed a growing trend of creating serving stations that are so abundant in food that they having a feeling of indulgence and opulence. It is a stark difference from some of the more minimalistic trends that I’m seeing happening in other areas such as home decor. The term that keeps popping up for this trend is “grazing table” or “grazing boards.” While I do love the idea of minimalism and restraint at times,  I do think there are a time and a place for such displays of opulence… holiday parties fit the bill for me. Read on to learn how I built my own Holiday Grazing Table.

This is the eighth post of my 12 Days of Christmas DIYs for 2018. Each day for the next twelve days I share DIY projects, recipes, entertainment, and more, that you can incorporate in your holiday season. Most will be super simple!

Tips for creating a holiday grazing table from awellcraftedparty.com

Okay, first of… yes, the term “grazing table” is ridiculous. Every time I say it I imagine a herd of cows coming up and destroying my carefully crafted and styled foods. However, in the past, something like this would have been called a “smorgasbord” and that certainly isn’t very appealing either! For a cocktail party (or cocktail hour at a wedding!) this is a fun and easy way to serve food so guests can come and go as they please.

I styled a holiday grazing table for my recent holiday open house. It was a hit! The best part was that I didn’t spend all day in the kitchen cooking and I didn’t worry about keeping foods hot. The party was only a couple of hours long so I also didn’t have to be concerned about chilling items. I served foods that were safe at room temp for the duration of the party.

A note on cost… grazing tables are not the most cost-effective way to host a party. Like buffets in general, you are buying a lot of food so that guests don’t run out of their options before the end of the meal. On a grazing table, in particular, you are not going to use the entire bag of nuts that you purchased or ALL of the olives in a jar. The great thing about these is that many of the items you purchase will still be good to do another grazing table/board for your next party as long as it isn’t too far away.

Tips for creating a holiday grazing table from awellcraftedparty.com

How to Build a Grazing Table

Building a grazing table has a LOT of flexibility in supplies and ingredients. You simply need to come up with a theme and run with it! I’ll share how I built my own holiday grazing table and hopefully, the tips will help you in building your own.

Supplies:

  • Table & Platters: For my grazing table, I knew that I was going to use my dining tables as the base of the table. I went back and forth on whether or not I wanted to use the table itself to put out all the food or if I wanted to opt for platters. I chose to use platters simply to help with cleanup after the party was over. I did use the table to house some different elements of decoration a bit… but mostly stayed on the platters. If you want a more decadent look then start building your table using the actual table as your first platter and then any other platters/bowls/cake stands for height and dimension. Had I used the table I had planned on putting down wax paper underneath where I was going to build up the food items.
  • Tongs: I don’t care how close you and your friends are… make sure there are tongs at your table so germs are not shared along with all the food. Other server options include small forks or toothpicks. It is flu season after all!
  • Plates & Napkins: Even though the style of the table suggests stopping by and grabbing items to eat as needed, most people like to make a small plate and move to another area of the party. Make sure you have plates and napkins within easy access. My table is a large square so I put some plates and napkins on both sides of the table. I served finger foods for my party so I didn’t need to put out silverware, but if you are serving anything that needs utensils then I’d highly recommend putting them out on the table within easy access as well.
  • Garnish/Decor: For this particular table I wanted the decor to mainly be the large floral centerpiece that I had created. I did, however, use some pomegranates and grapefruit as a garnish as well.
  • Food: This is the star of the show after all! Building a beautiful grazing table is all about working with your ingredients. Read on to see the ingredients I used for my holiday grazing table and how I chose to style them.

Holiday Dessert Grazing Table | A Well Crafted Party

Picking food for a Grazing Table:

I knew that I wanted my grazing table to be filled with foods that are fairly sturdy and safe at room temperature for a couple of hours. I also knew that I wanted it to be easy to eat without utensils. It is SO difficult to balance a drink and plate and fork while at a cocktail party! Finally, the time of year also dictated some of my selections… I wanted some of the food to feel festive and holiday-appropriate. Below is a list of the food items I chose.

Savory:

  • Cured Meats: I used pepperoni and salami.
  • Baked Ham: I decided that ham would be the perfect holiday note to this grazing table so I baked a ham and didn’t put it out until minutes before the party started. It was all gone by the end of the evening!
  • Cheeses: Cheddar, White Cheddar with Black Pepper, Gouda, Colby Jack, and Munster Cheeses were on the savory side of my grazing table. I honestly just picked some crowd-friendly types that were on sale.
  • Nuts: I used almonds and cashews. These were great at filling in spaces on the table! I did make sure that we didn’t have any nut allergies in the crowd before putting these on the boards. If you are unsure, it may be more thoughtful to put nuts in a single dish rather than strewn about on the table.
  • Popcorn: This was a last minute addition because I made some for the kids and had quite a bit leftover… but, popcorn is a great salty snack to serve at parties!
  • Olives: I had three different types of olives throughout the table. I did make sure all of the olives were pitted… it is no fun biting into a pit!
  • Fruit & Vegetables: We put out sugar snap peas, carrots, and cucumbers for this table. Though, really, the sky is the limit here. Vegetables are beautiful and are great ways to fill in spaces. I also served apples because I love the pairing of cheddar and apples. Had I served blue cheese then pears would have ended up on the table.
  • Dips & Sauces: Little bowls of dips and sauces are a great addition to the table. We served hummus and spinach dip to complement the vegetables. We also added a bread dipping sauce made with olive oil, vinegar, and spices as well as a delicious mustard to pair with the ham.
  • Bread and Crackers: I used three different types of crackers and two different kinds of baguettes for the table.

Sweet: 

  • Chocolates: I bought three different chocolate bars of varying flavors and cut those up to be placed throughout the board to fill up spaces and give some dimension.
  • Holiday Treats: Some of my favorite holiday treats found there way on the table including the Starbucks Cranberry Bliss bar, peppermint bark, chocolate ornaments, chocolate covered pretzels, and meringue cookies.
  • Cheese: Yes, cheese can certainly end up on this side of the table! I served some beautiful French brie in the middle of the beautiful berries!
  • Pastries: I bought a box of cream puffs and mini eclairs to fill out the board with something a bit more substantial. They were a favorite of all the guests!
  • Fruit: All of the decadence above really needed a pairing that would help lighten it up but still give a little sweetness. Berries were the perfect punch of red color in a sea of chocolates! I created a sort of cheesecake filled strawberry and raspberry and put those out on the table as well as some plain berries. I also included some sugared cranberries because they are gorgeous! By the end of the night, ALL the berries were gone!

Holiday Dessert Grazing Table Styling Tips from awellcraftedparty.com

Grazing Table Styling Tips

The big part of what makes a grazing table so beautiful is that the foods are not just put out on platters without thought. Below are some ideas that will help with styling your table:

  • Mix it up: Consider not putting like-items all together. While I’ve seen gorgeous grazing tables that feature some platters piled high of one item only, I wanted my table to be a bit more free-form. It really worked well with the location because it was a giant square table in the middle of a square room. Guests didn’t need to travel around the table to be able to reach what they wanted. Each section of the table (for the most party) included all the items that I was putting out.
  • Style in Steps: While the prep of this style of party food is super simple it does take some serious time to build the table. Also, because food safety is essential, it makes a lot of sense to start prepping the table in steps. I started with putting out items that were completely safe at room temperature for long periods of time. Crackers, chocolates, nuts, fruit, olives, vegetables, etc. I started shaping how I wanted my boards to look by putting these items out randomly. I then went in and built it out with the cheeses and then the meats.
  • Limit things: I know it doesn’t seem like it… but, I did limit myself some on this table. I knew I was serving approximately 20 people so I wanted to have a few different options, but it can get super overwhelming to prep and put out a ton of items! Limiting your shopping list will not only help your budget, but it will also help in styling things. You’ll have fewer steps!

Holiday Dessert Grazing Table Styling Tips from awellcraftedparty.com

Grazing Table Inspiration:

  • The first time I ever saw a grazing table display was from Portland-local catering company White Pepper. I don’t even know if the term was trending then or if that is what they’d call their work… but, it is simply gorgeous. Check out the White Pepper Instagram to see some serious grazing table inspiration and inspiration for beautiful food presentation in general.
  • Graze Gourmet Platter Company has it right in their title! This catering and events company is out of South Australia. Te Graze Gourmet Platter Company Instagram is chock full of crazy gorgeous grazing tables. Their holiday grazing table incorporates gorgeous meats and cheeses along with some fun candies and chocolates!
  • Lenas Kitchen Blog has been an inspiration to me for years with the way she creates her gorgeous charcuterie boards. She even teaches workshops on how to craft a perfect spread. The Lena’s Kitchen Instagram is drool-worthy and she has great Insta-stories where she will cook with you!