Tag

christmas

Browsing

12 Days of Christmas DIYs // A Well Crafted Party

This post is the last post in my series of the 12 Days of Christmas DIYs for A Well Crafted Party. There are lots of free printables! (Check out my last post in this series: “Wine Gift Tag Free Printables“) Even though I’m done with my  12 Christmas DIYs… I’m not done bringing fun things to the blog! I’ve got some NYE items up (including free party printables) and more holiday beverages to enjoy!


Happy and Healthy Holiday Neighbor Gifts + Free Printables // A Well Crafted Party


I work in an office. This time of year the colds start passing from one cubicle to the next. In addition, there is a whole table full of sweet treats in the break room that is HARD to resist. So, when thinking about the ideal affordable, but still welcome co-worker gift I wanted to do something that would encourage a healthful holiday and new year.

Happy and Healthy Holiday Neighbor Gifts + Free Printables // A Well Crafted Party

These co-worker or neighbor gifts are super affordable and can be filled with whatever you find handy. I bought three little honey containers from Trader Joes for less than $7, a box of tea and some citrus fruit to make these little gifts. After wrapping in cellophane and wrapping in a bow I topped it with a printable tag. Yes, I like printables. 😉

How to use the Happy and Healthy Printables:

  1. Click the link below to download the printables, save to your computer.
  2. Print on cardstock in full color.
  3. Cut out the tags.
  4. Use a hole punch on the white circle and thread ribbon through the hole and attach to your gift!

Click here to download—> Happy & Healthy Printables <—Click here to download

Happy and Healthy Holiday Neighbor Gifts + Free Printables // A Well Crafted Party


12 Days of Christmas DIYs // A Well Crafted Party

This post is the forth in my series of the 12 Days of Christmas DIYs for A Well Crafted Party. Check in each day for the next 12 Days for new DIY posts. There will be LOTS of free printables to boot! (Check out yesterday’s post: “DIY Wood Chargers“)


DIY Holiday Card Display // A Well Crafted Party

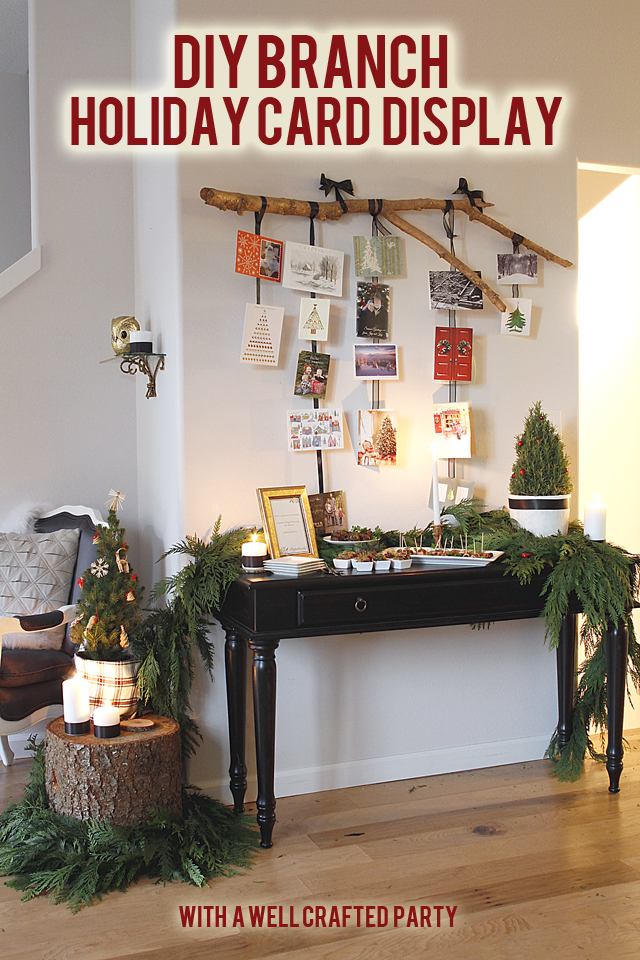
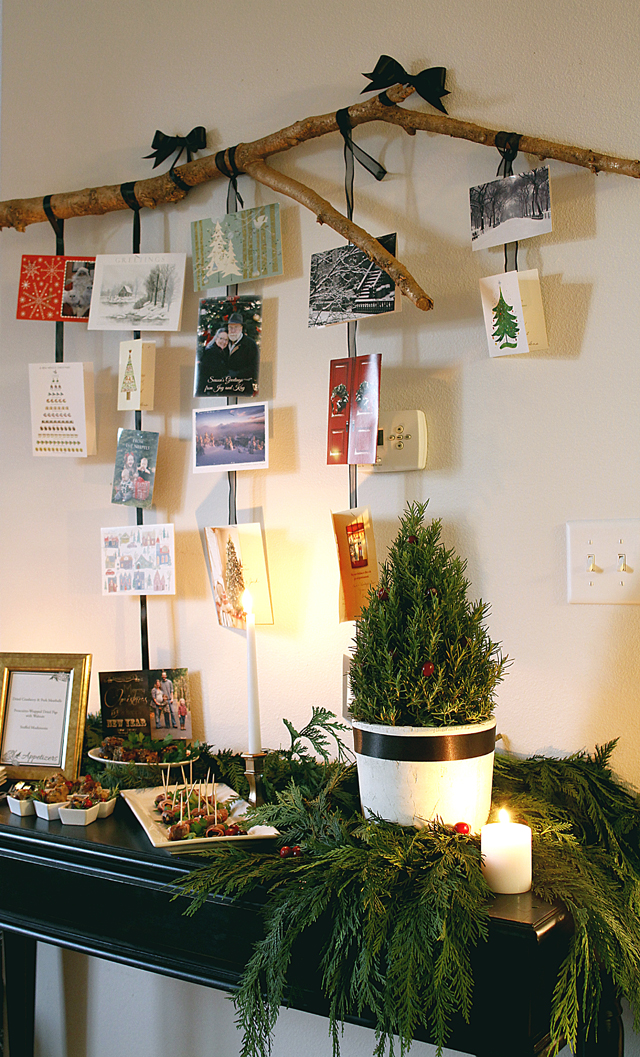
I love receiving (and sending) holiday cards. The problem is figuring out where to put said cards each year. Sometimes I display them on a cabinet. Other times of fridge gest covered. This year, I’m displaying them more promenitely… giving them the attention they deserve! This do-it-yourself project is super simple… the hardest part involves finding a branch!

DIY Branch Holiday Photo Holder Supplies:

(Affiliate Links Below)

How to Make a Branch Holiday Card Display // A Well Crafted Party

How to make a Gilded Branch Holiday Photo Display:

1. Find a branch! This might be the hardest and easiest part of this whole ordeal. Before I lived in my house with a gigantic tree out in the yard I wouldn’t have been able to tell you where to find a branch. This branch literally fell into our yard after a big wind storm. Other ways to find a branch besides waiting on mother nature include trimming a tree or finding tree pieces ready to go out with the garbage. Please note that you should either be doing these things with your own trees or asking first… otherwise it might be a little difficult to explain to future employers that you got arrested for trying to make a holiday card display.

2. Trim off small branches and foliage. Our branch fell from a very large and old evergreen tree. It was covered in pine needles. My husband so graciously took the time to take off the offshoots for me, leaving me with a bare branch. (It is completely easy enough to do yourself, I just happen to be allergic!)

3. Sand down stumpy parts and dangerous edges. Don’t want to get splinters when putting up your holiday cards!

4. Spray paint! This is the fun part. You can totally leave your branch bare if you’d like… you can even take the bark off and sand down the branch for a beautiful bare branch look. I wanted my card holder to be gilded though! So, I sprayed the branch with the Copper Metallic spray paint until it had a pretty sheen. After drying I did a layer of clear sealer to try to prevent the paint scuffing off. (I should have probably done two layers as some of the paint scuffed up my friend’s walls during this photoshoot. EEK.)

5. Mount your branch. For this photoshoot we actaully just tied ribbons around the branch and nailed the ribbon to the wall. This is not the most sturdy solution. For day to day use I’d actually suggest mounting curtain brackets and placing the branch in those. You’d have to find brackets large enough to fit your branch, and then secure the branch by tighting the brackets around it. I like using the Ikea brackets on my wall throughout the year and changing out wall hangings for parties!

6. Hang ribbons on the branch to attach your holiday cards. Use a slip knot to tie on your ribbon. That way, at the end of the holiday you can easily pack away your branch. (Check out my ribbon backdrop wall for pictures of ribbons with slipknots!)

7. Hang your cards! As you receive your holiday cards and photos secure them to the backdrop using a paperclip, staple or glue dot!

 More Holiday Goodies:

Do you want to see more from this Holiday Styled Shoot?

Photos from this project was from a recent Holiday Styled Shoot collaboration between myself and Suzannah of Create/Enjoy and Macey from Motormouth Studio. Check out my main post with links to DIY projects & recipes: “Natural Green and White Holiday Party + Free Printables” A big thank you to Orchard Supply Hardware for providing a couple of the supplies to make this DIY happen!

12 Days of Christmas DIYs // A Well Crafted Party

This post is the second in my series of the 12 Days of Christmas DIYs for A Well Crafted Party. Check in each day for the next 12 Days for new DIY posts. There will be LOTS of free printables to boot! (Check out yesterday’s post: “Natural Green & White Holiday Party + Free Printables“)


Festive Holiday Drink Garnish // A Well Crafted Party

A good garnish will take a simple boring beverage (take, water for instance) and make it something special. I like most of my garnishes to be simple to make, because who has time to spend on creating intricate and fussy drink garnishes? Not me!

Festive Holiday Drink Garnish with Cranberries

To make your water glass pop or to give a festive twist to a Vodka and Soda on the rocks, try adding cranberries to your ice-cube tray and making cranberry ice.

Cranberry Ice Instructions // A Well Crafted Party

There is actually one or two steps in this ultra-easy DIY because cranberries will float the the top of your ice cubes and look pretty silly in your drink unless you take the time to freeze in steps. Why not just throw cranberries in a pitcher? They’ll all float to the top! The ice cubes will float as well, but it will look more evenly distributed throughout the pitcher.

Cranberry Ice Cube DIY // A Well Crafted Party

Directions for making cranberry filled ice cubes:

  1. Using distilled water or previously boiled water (freezes more clearly than tap water) fill your ice cube tray about 1/4 of the way full.
  2. Drop in a handful of cranberries in each cube area.
  3. Freeze (you don’t need to freeze overnight, but you do want the ice cubes to be solid before adding more water or partial cubes will float up.)
  4. After freezing add more water (fill until the cubes are 3/4 full, leaving a little space for more water) and cranberries. Freeze again.
  5. Finally, fill with just water so that the cranberries are entirely covered.

This doesn’t need to be perfect. I had a few cubes where I didn’t layer quite right and the berries poked out of the bottom a bit. It still looked festive in the water pitcher!

Cranberry Drink Garnish DIY // A Well Crafted Party

Need an ice-cube tray?

(affiliate links)

When discussing this DIY project with someone else I found out that not everyone has ice cube trays! Some people have super cool machines that will MAKE ice for them! (AMAZING.) But, you will need ice cube trays to make this project work. I like the idea of trying out the large cube trays (like the ones in the above picture) or a spherical tray to make a festive ice ball!

Do you want to see more from this Holiday Styled Shoot?

Photos from this project was from a recent Holiday Styled Shoot collaboration between myself and Suzannah of Create/Enjoy and Macey from Motormouth Studio. Check out my main post with links to DIY projects & recipes: “Natural Green and White Holiday Party + Free Printables”