Category

A Well Crafted Home

Category

I DIY a lot of items around my house. I DIY in part to save money, but also because I generally love the process of seeing an idea turn out. Now, I say generally because there are a few DIY projects that I start and hate the entire time I’m doing… like painting.

DIY Painted Table & Chairs

I always think that I will enjoy painting something because it is so much more inexpensive than buying new and it always yields a big transformation. I just have no patience for painting. Event though I’m not a huge fan, paint was a big part of my DIY makeover for my summer porch.


DIY Outdoor Painting Projects - A Well Crafted Party


For our outdoor dining area we decided to paint an old kitchen table that we owned and a couple of thrift store chairs. I am not a painting expert… mostly because I dislike the time it takes to do painting projects. I’m an afternoon DIY girl—when it takes days or weeks to complete I put it off as long as possible.

Take this table… I bought the sanding tools, paint, sealer and drop cloth 3 years ago to make our old kitchen table work for an outdoor table. I have finally gotten around to painting the sucker! (And, to be totally honest, I still haven’t sealed it. That has to happen before the next big rain!)

The chairs came with I think six coasts of paint on them prior to me wanting to paint them. I got them for a steal at $5/ chair, but the sanding work took forever and they still weren’t perfect before painting. I did know that I wanted the chairs to have a worn look, so I am not disappointed with how they came out. They too will get a couple coats of sealant before the next big rain.

Looking to paint your own wood items for outdoors? Check out these sources I used for tips:

DIY Process

I actually ended up lightly sanding the table and heavily sanding the chairs (though, as you can tell from the above photo… probably not enough for a nice professional looking paint job. I went with Rust-Oleum spray paint for both projects. The chairs got several coats of the Gloss Warm Yellow Paint and the table got a flat white spray. I am using a roll on polycrylic protective finish on both projects. I will not be keeping the items out during super inclement weather, but wanted to still protect them for the occasional shower.

After DIY Outdoor Table - A Well Crafted Party

DIY Outdoor Table - A Well Crafted Party


I can’t deny that paint makes a huge difference. I love my outdoor table and chairs enough that I will likely go through the pain and agony of painting many more times in my life. Seeing it in my yard makes me happy each and every day!

What do you think about DIY Painting projects? Love them or hate them? Have one you are proud of?? Link below! I’d love to see!


Updating Post to say that I’m linking up to the following Link Parties:

  • Skip to my Lou Made By You Mondays 

When we first walked into our (now) home it was being updated by the owner and it was a disaster. But, we had been having NO luck finding an affordable rental home in the Portland area and this home wasn’t quite on the market yet, so we tried to look at it through the mess and see what potential it had. The owner explained some of the updates the home would have (new carpet, new paint, etc.) as we were walking through it. It is an old home and it hasn’t been maintained very well. It could really use new windows throughout, but the instant we pulled up to the mint green home I knew it was going to be our next move.

The home has such personality and character. And, even though there are things I would change (no dishwasher!? only one bathroom!?) I love this little home and will be very sad the day we leave it, even if it is for a better home.

Summer Porch Makeover for a Rental - A Well Crafted Party

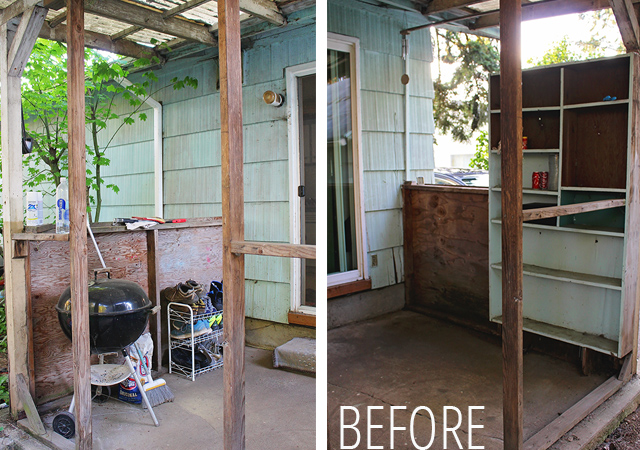
One of the areas that I wanted to touch up from the beginning was the back porch area. Being a rental, we don’t want to put a lot of time and money into it, but we did want the space looking better. We have three amazing yard areas at our home and we throw parties outdoors basically from June through November, so updating the space has been on my home bucket list for some time. It took us three long years before we finally got around to it, but it makes me more happy than you can imagine!

Before our Summer Porch Makeover - A Well Crafted Party

Because it is a rental home we were not allowed to make big changes to the space. Ideally the porch needs redone as much of the wood is cracked and broken from not being properly prepared for the Pacific Northwest weather. Normally we wouldn’t even be able to paint, but we asked the owner for permission letting him know that our intentions were to help weather proof the area a bit more and streamline it with the house. The white outdoor paint really makes the porch much nicer and ( I think) will be an overall win for the value of the house when we leave.

We knew that the space would need to include our shoe rack (the boys leave their shoes on the porch area until the rainy season), a rug, our grill and supplies and some of my outdoor entertaining items. I seriously have a problem with buying plates and we have just run out of room indoors and in our garage, so utilizing the book shelf area during the summer months with items that we use frequently made sense. We will need to store much of these items during the rainy months, but I have some fun ideas to make the space festive for the holidays, so I am not worried!

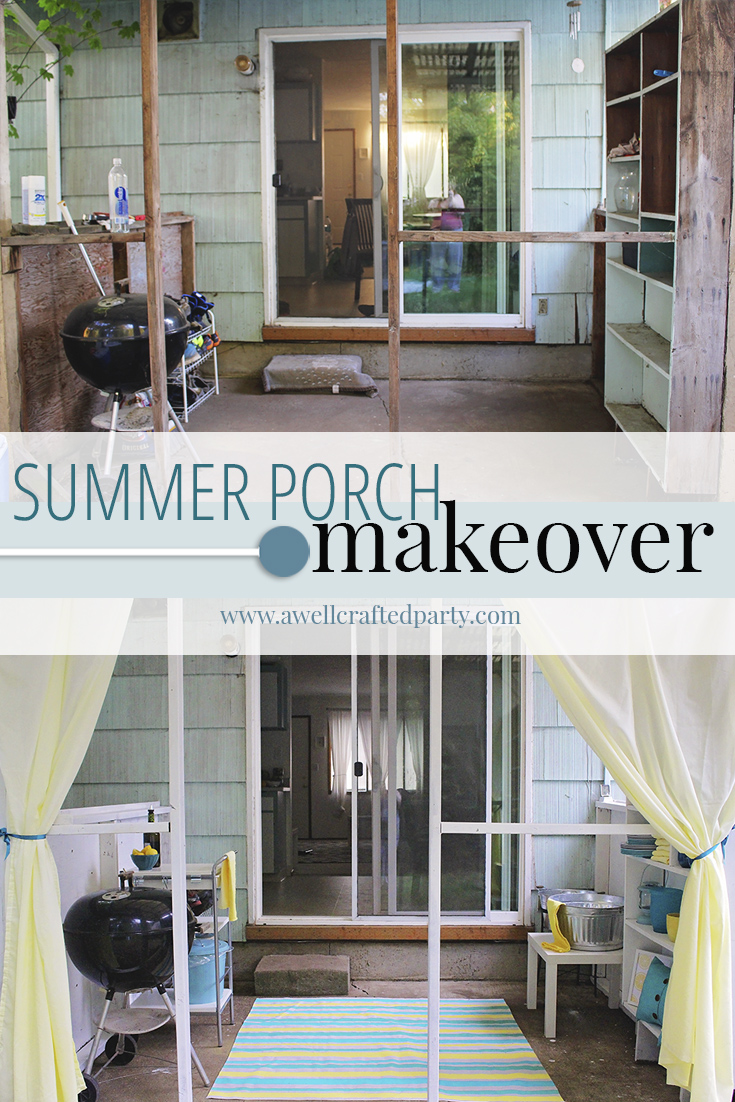
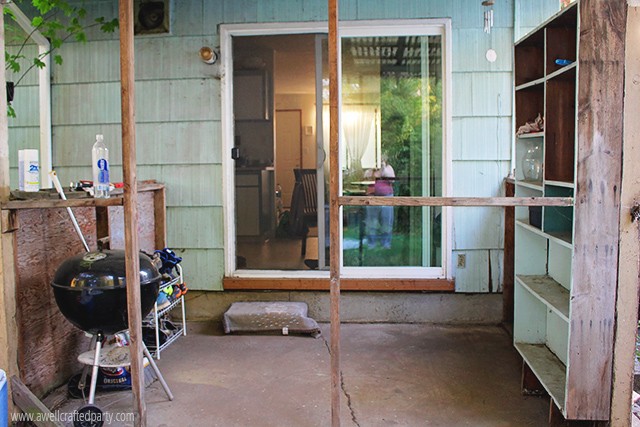
One last look at the before…just so you can see just how bad it was:

Summer Porch Makeover Ideas - A Well Crafted Party

Summer Porch Makeover for Our Rental Home

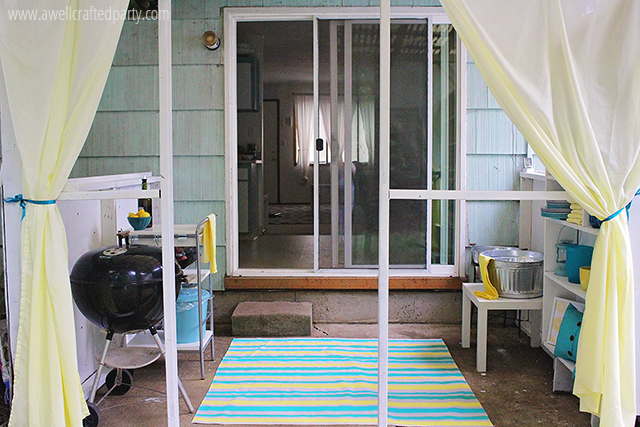
Something about white paint just makes everything look cleaner and more put together. We chose to go with a Crisp Linen White Glidden exterior paint for the porch area. After cleaning the porch as much as possible we sanded down areas that needed it and just plopped the paint directly on the wood. It took a couple of coats, but the paint went on nicely and looks good!

After our Summer Porch Makeover - A Well Crafted Party

We accented the area with my outdoor entertaining items, a new cart for our grill supplies, a couple free printables and a couple of easy DIY projects. If you are currently reading this on the desktop version of my blog then you might have noticed that I have a small love for these colors. I really like how bright and summery my porch area is now!

My porch bookshelf houses my many outdoor entertaining items in a neat and organized fashion.

Our grill area is much more functional now that we added a little grill cart!

All my outdoor entertaining items fit so nicely on my outdoor bookshelf!

My porch bookshelf houses my many outdoor entertaining items in a neat and organized fashion.


Summer Porch Makeover Highlights:

Many of the updates on the porch area were temporary, inexpensive and super easy. They either utilized items we already had around the house and really just needed a permanent home for or inexpensive purchases that will last a long time.

  • Our new DIY rug was super inexpensive to make and is great for all the foot traffic we have in our back yard area. It can get super messy, but is easy to clean and replace if damaged. (Check back tomorrow for my post on the DIY elements!)
  • We still managed to keep our shoe rack in the area and it doesn’t look too terrible. It helps that the rack is also white.
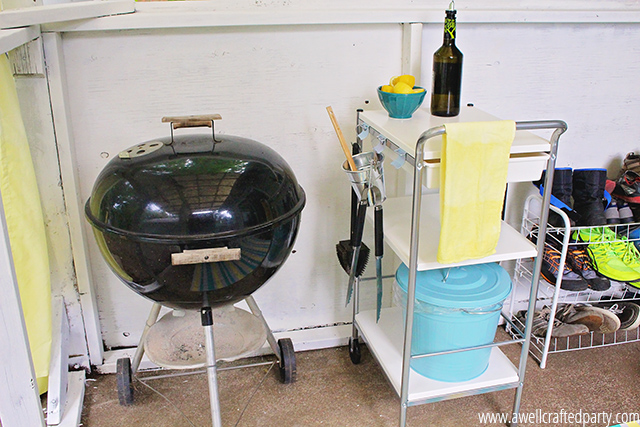
  • One of my favorite additions to the space was the small grill cart that I purchased from Ikea. The cart has made grilling much more fun and less of a chore. The small little trash can underneath helps with scraps or trash items during cooking or throughout our outdoor events.
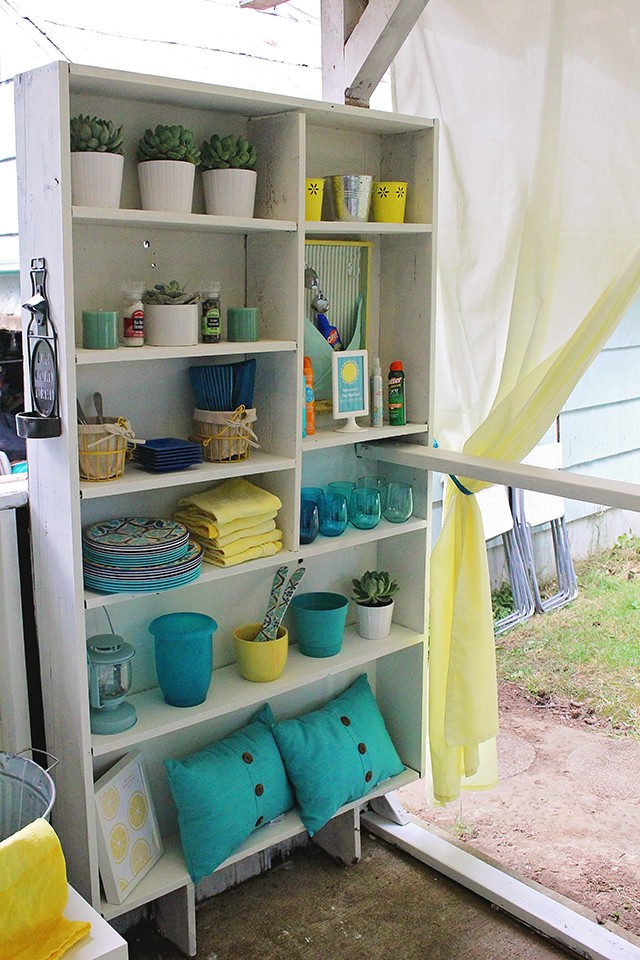
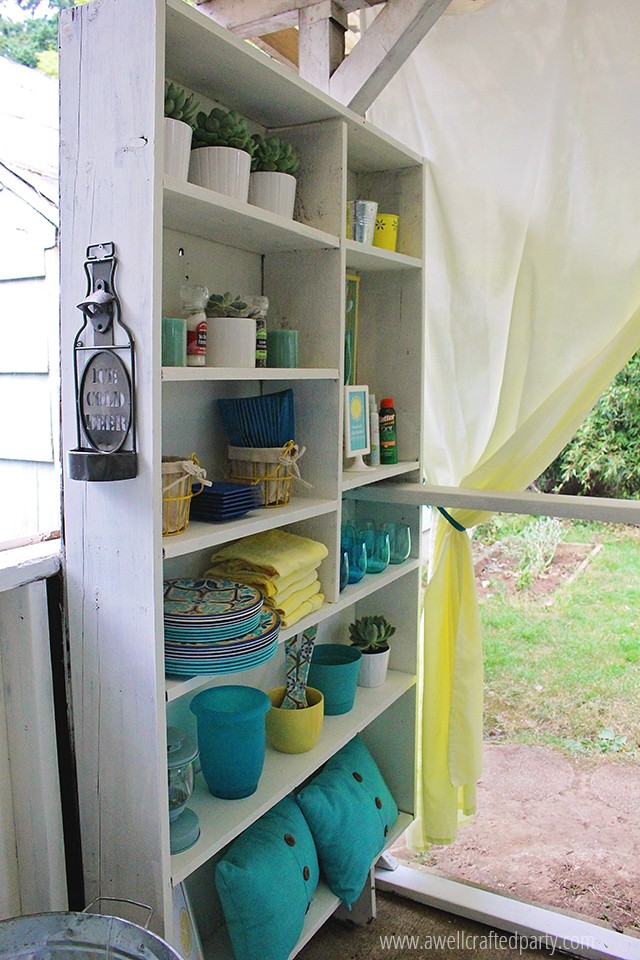
  • My DIY Sunscreen and Bug Spray station fit perfectly in the bookshelf. That way, anyone who is over has instant access to skin protection if they need it.
  • A few items that we use for our outdoor dining area are housed up on the bookshelf when not in use just in case there is a sudden storm. All of the items on the bookshelf stay pretty well covered from the elements due to the shelter overhead.
  • We added curtains to the space to help shield off some of the sun and separate the space a bit more. I decided to do the curtains last minute and they are one of my favorite elements of the whole space!
  • I love the lemon print that I got for FREE from Live Laugh Rowe. It says, “Life’s Short. Squeeze all you can out of it!”
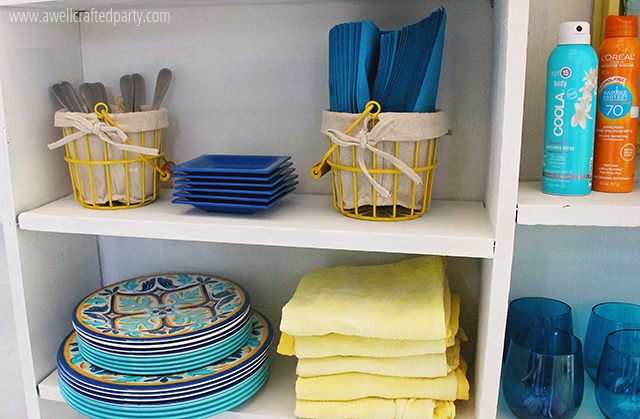
  • Part of the reason I was inspired to redo my porch area is thanks to Kohl’s! I was asked to work on a Summer celebration post (coming next week- you don’t want to miss it!) and was gifted a gift card in order to get items to help throw my celebration. I really love my new dishes from the Bobby Flay Home series at Kohl’s as well as the outdoor pillows, beer opener, wire baskets and outdoor glassware. Every time I look in my back yard area now I want to have another party!
  • Pinterest (as always) was a great place for me to catalog ideas for the space. Check out my DIY Outdoor Living Space board for more inspiration!

What home improvements have you worked on this summer? Are there elements here that you could incorporate into your own outdoor space?


Part of the items featured in this post were made possible with a partnership with Kohl’s. Thank you to Kohl’s for helping me entertain this summer. Thanks to readers for supporting the companies that help make this blog bring new content to the interweb. I only promote companies that I actually use myself and enjoy. Please see my policies for more information. 

Updated to say that I’m linking this post up to the following awesome link parties:

12 Days of Christmas DIYs // A Well Crafted Party

This post is the forth in my series of the 12 Days of Christmas DIYs for A Well Crafted Party. Check in each day for the next 12 Days for new DIY posts. There will be LOTS of free printables to boot! (Check out yesterday’s post: “DIY Wood Chargers“)


DIY Holiday Card Display // A Well Crafted Party

I love receiving (and sending) holiday cards. The problem is figuring out where to put said cards each year. Sometimes I display them on a cabinet. Other times of fridge gest covered. This year, I’m displaying them more promenitely… giving them the attention they deserve! This do-it-yourself project is super simple… the hardest part involves finding a branch!

DIY Branch Holiday Photo Holder Supplies:

(Affiliate Links Below)

How to Make a Branch Holiday Card Display // A Well Crafted Party

How to make a Gilded Branch Holiday Photo Display:

1. Find a branch! This might be the hardest and easiest part of this whole ordeal. Before I lived in my house with a gigantic tree out in the yard I wouldn’t have been able to tell you where to find a branch. This branch literally fell into our yard after a big wind storm. Other ways to find a branch besides waiting on mother nature include trimming a tree or finding tree pieces ready to go out with the garbage. Please note that you should either be doing these things with your own trees or asking first… otherwise it might be a little difficult to explain to future employers that you got arrested for trying to make a holiday card display.

2. Trim off small branches and foliage. Our branch fell from a very large and old evergreen tree. It was covered in pine needles. My husband so graciously took the time to take off the offshoots for me, leaving me with a bare branch. (It is completely easy enough to do yourself, I just happen to be allergic!)

3. Sand down stumpy parts and dangerous edges. Don’t want to get splinters when putting up your holiday cards!

4. Spray paint! This is the fun part. You can totally leave your branch bare if you’d like… you can even take the bark off and sand down the branch for a beautiful bare branch look. I wanted my card holder to be gilded though! So, I sprayed the branch with the Copper Metallic spray paint until it had a pretty sheen. After drying I did a layer of clear sealer to try to prevent the paint scuffing off. (I should have probably done two layers as some of the paint scuffed up my friend’s walls during this photoshoot. EEK.)

5. Mount your branch. For this photoshoot we actaully just tied ribbons around the branch and nailed the ribbon to the wall. This is not the most sturdy solution. For day to day use I’d actually suggest mounting curtain brackets and placing the branch in those. You’d have to find brackets large enough to fit your branch, and then secure the branch by tighting the brackets around it. I like using the Ikea brackets on my wall throughout the year and changing out wall hangings for parties!

6. Hang ribbons on the branch to attach your holiday cards. Use a slip knot to tie on your ribbon. That way, at the end of the holiday you can easily pack away your branch. (Check out my ribbon backdrop wall for pictures of ribbons with slipknots!)

7. Hang your cards! As you receive your holiday cards and photos secure them to the backdrop using a paperclip, staple or glue dot!

 More Holiday Goodies:

Do you want to see more from this Holiday Styled Shoot?

Photos from this project was from a recent Holiday Styled Shoot collaboration between myself and Suzannah of Create/Enjoy and Macey from Motormouth Studio. Check out my main post with links to DIY projects & recipes: “Natural Green and White Holiday Party + Free Printables” A big thank you to Orchard Supply Hardware for providing a couple of the supplies to make this DIY happen!