Tag

Christmas DIY

Browsing

In the good year 2023, the year of Taylor Swift, Beyoncé, and The Barbie Movie, I say… lean in to the fun, the sparkle, the pink, and the friendship bracelets. Don’t just stop at the viral friendship bracelet Christmas tree garland (genius I say) but go ahead and keep on stringing the nostalgia to add fun sayings to other holiday essentials. Namely, the stemware.

This post contains affiliate links, marked with an asterisk (*). Affiliate links help this blogger earn money with purchases made without any added cost to those who purchase. Thank you for supporting my blog!

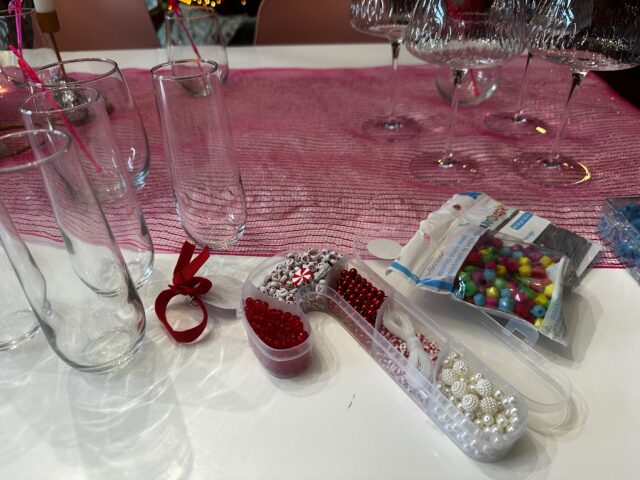
To say that this is a tutorial would be a stretch of the word to be sure. I simply found a friendship bracelet kit and used my stemware to estimate the sizing for each individual piece. I’ll give my best tips and links below, but this craft can be done with the simple kits found at your local craft store or more elaborate beads. You can use charms or words to make your bracelets unique. But, the key to this craft comes down to using stretchy string, tying a strong knot, and keeping each piece unique enough that it can identify a glass.

Wine Tag Friendship Bracelet Sizing

For my upcoming party I have two types of glasses that I want to help guests keep straight. One is a stemless champagne flute and the other a stemmed coupe glass. This required me to make two slightly different sized bracelets. I made a slightly larger bracelet (around 2.25 inches around) for the stemless glass so that it could go down far enough to not impede drinking but far enough up to not be annoying to the glass holder. The stemware had to be big enough to stretch over the bottom of the glass, but not large enough to get snagged or fall off. They ended up being more like 1.50 inches around.

TIP: When cutting your string go ahead and cut more than you need and measure to the glass often. It will make it easier to hold and to knot. You can then cut off the excess string.

Holiday Wine Tag Sayings

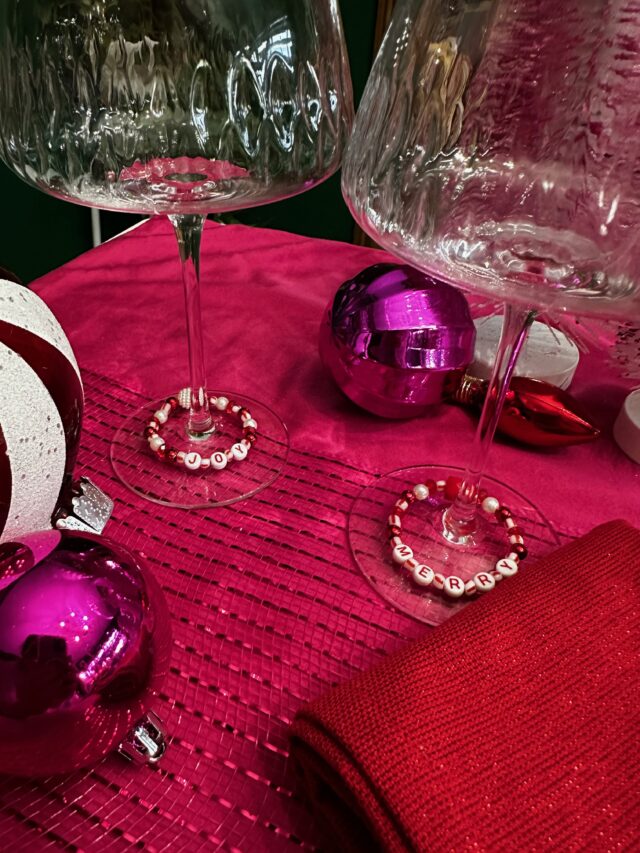
This was the most fun! Since these are much smaller than traditional friendship bracelets I had to stick with one holiday-centric word for each tag. Guests will be able to remember the word and keep track of their glass.

Suggested Holiday Tags: (This is not an exhaustive list– there are SO many options!)

  • Holly
  • Jolly
  • Santa
  • Elf
  • Joy
  • Merry
  • Bright
  • HoHoHo
  • Christmas
  • Noel
  • Star
  • Gift
  • Snow
  • Carol
  • Cheer
  • Bells

Holiday Friendship Bracelet Wine Tag Resources

I grabbed my beads on a holiday clearance rack while out shopping, but I’ve shared some resources below. I stuck to red and white for my colorscheme, because I want to use them throughout the years and tend to pull these two colors in most of my Christmas themes. However, you can mix it up to match your own holiday decor!

Dare I say that this would make for a fun gift as well? Or an added pizzazz to a cute gift of thrifted stemware? I’d find it charming!

May your drinks stay with their intended this holiday season and may this season of friendship bracelets, sparkling outfits, and powerful women live well into the new year!

“Just hear those sleigh bells jinglin’, ring ting tinglin’ to…” Tis the season for catchy, classic tunes, hot cocoa by the fire, and holiday DIYs! It is my favorite time of the year and to celebrate it, I’ve created some fresh new content for a new batch of 12 Days of Christmas DIYs that will begin tomorrow, December 1st.

In beginning new DIY cocktails, entertainment, and crafts for the blog I first had to go back through my hundreds of posts to see what I’ve done before. That got me all nostalgic and I had to share some of my favorite Holiday DIYs from Christmas Past.

DIY Branch Holiday Card Display | A Well Crafted Party

DIY Branch Holiday Card Holder

Christmas cards are coming to town and often, I struggle with where to display them! I love opening the mail and seeing bright and shiny faces of my loved ones and messages of holiday cheer. I don’t want them sitting in a pile along with my bills! For a rustic holiday touch, you can easily create a holiday card holder utilizing a fallen or trimmed branch.

Holiday Neighbor Gift | A Well Crafted Party

DIY Holiday Neighbor Gift + Free Printable

Finding holiday gifts that are affordable, but nice for neighbors or coworkers is always something that I struggle with each holiday season. One of my favorite solutions was this Healthy and Happy Holiday gift that included an orange, tea, and honey! The free printable tags could really work for a variety of holiday gift ideas that include healthful treats.

Holiday Wine Gift Tag | A Well Crafted Party

Holiday Wine Gift Tags – Free Printables

Every year I attend at least one or two holiday events where I inevitably want to bring a bottle of wine as a hostess gift or addition to the holiday cheer. Printing off these holiday wine bottle tags makes the gift of wine look intentional and festive!

Holiday Recipe Cards | A Well Crafted Party

Holiday Recipe Cards

Have you ever gone to a holiday potluck and fallen in love with one of the dishes to be disappointed that you have no way to recreate it? I have! These holiday recipe cards make for awesome favors or additions to a holiday potluck so friends can share their favorite recipes.

DIY Holiday Party Food | A Well Crafted Party

Easy DIY Holiday Recipes

Speaking of holiday party recipes… This final favorite DIY is actually a series of easy recipe solutions for holiday parties. My segment on Portland Today shared three easy holiday party food DIYs.

Holiday Party Tips | A Well Crafted Party

More Holiday Party Tips

Want some more simple holiday DIYs? Check out my segment on Afternoon Live where I share some really easy holiday party tips and DIY projects.


12 Days of Christmas DIYs // A Well Crafted Party

This post is the forth in my series of the 12 Days of Christmas DIYs for A Well Crafted Party. Check in each day for the next 12 Days for new DIY posts. There will be LOTS of free printables to boot! (Check out yesterday’s post: “DIY Wood Chargers“)


DIY Holiday Card Display // A Well Crafted Party

I love receiving (and sending) holiday cards. The problem is figuring out where to put said cards each year. Sometimes I display them on a cabinet. Other times of fridge gest covered. This year, I’m displaying them more promenitely… giving them the attention they deserve! This do-it-yourself project is super simple… the hardest part involves finding a branch!

DIY Branch Holiday Photo Holder Supplies:

(Affiliate Links Below)

How to Make a Branch Holiday Card Display // A Well Crafted Party

How to make a Gilded Branch Holiday Photo Display:

1. Find a branch! This might be the hardest and easiest part of this whole ordeal. Before I lived in my house with a gigantic tree out in the yard I wouldn’t have been able to tell you where to find a branch. This branch literally fell into our yard after a big wind storm. Other ways to find a branch besides waiting on mother nature include trimming a tree or finding tree pieces ready to go out with the garbage. Please note that you should either be doing these things with your own trees or asking first… otherwise it might be a little difficult to explain to future employers that you got arrested for trying to make a holiday card display.

2. Trim off small branches and foliage. Our branch fell from a very large and old evergreen tree. It was covered in pine needles. My husband so graciously took the time to take off the offshoots for me, leaving me with a bare branch. (It is completely easy enough to do yourself, I just happen to be allergic!)

3. Sand down stumpy parts and dangerous edges. Don’t want to get splinters when putting up your holiday cards!

4. Spray paint! This is the fun part. You can totally leave your branch bare if you’d like… you can even take the bark off and sand down the branch for a beautiful bare branch look. I wanted my card holder to be gilded though! So, I sprayed the branch with the Copper Metallic spray paint until it had a pretty sheen. After drying I did a layer of clear sealer to try to prevent the paint scuffing off. (I should have probably done two layers as some of the paint scuffed up my friend’s walls during this photoshoot. EEK.)

5. Mount your branch. For this photoshoot we actaully just tied ribbons around the branch and nailed the ribbon to the wall. This is not the most sturdy solution. For day to day use I’d actually suggest mounting curtain brackets and placing the branch in those. You’d have to find brackets large enough to fit your branch, and then secure the branch by tighting the brackets around it. I like using the Ikea brackets on my wall throughout the year and changing out wall hangings for parties!

6. Hang ribbons on the branch to attach your holiday cards. Use a slip knot to tie on your ribbon. That way, at the end of the holiday you can easily pack away your branch. (Check out my ribbon backdrop wall for pictures of ribbons with slipknots!)

7. Hang your cards! As you receive your holiday cards and photos secure them to the backdrop using a paperclip, staple or glue dot!

 More Holiday Goodies:

Do you want to see more from this Holiday Styled Shoot?

Photos from this project was from a recent Holiday Styled Shoot collaboration between myself and Suzannah of Create/Enjoy and Macey from Motormouth Studio. Check out my main post with links to DIY projects & recipes: “Natural Green and White Holiday Party + Free Printables” A big thank you to Orchard Supply Hardware for providing a couple of the supplies to make this DIY happen!