I’m a big fan of invitations. BIG FAN. After brainstorming an event I typically focus on invitations next. Often I create my own–although, I know my limitations and sometimes opt to buy from some of my favorite invitation supply stores.
Today we’re gonna focus on the do-it-yourself invitation:
Once I get an idea for a party I start to focus on how the invitation can convey the theme of the party without blatantly writing “this is the theme”. Then I play around a bit on my computer or with my pens and papers until I create something I really like. After the first prototype I try to lessen the steps and then create an assembly line for myself to process invitations in bulk.
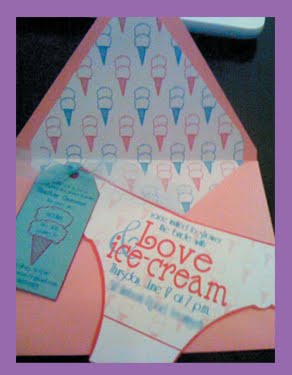
My invitation for my upcoming “Love and Ice Cream” Personal Shower:
While designing an invitation I use either my word processing software (Pages), Adobe Illustrator or Adobe Photoshop. There are a lot of great page layout software that would also work well for most home designs. If I am making an invitation for one of my own parties and don’t have a font I typically drool over the amazing selection of free for personal use fonts over at DaFont.com. Please note that if you use these fonts they should only be for personal use and many of the fantastic designers have websites with fonts to purchase or a lovely little link that allows you to help donate to the artist.
Tools for creating an invitation:
The tools vary based on what you design but mine often include: computer, printer, paper, card stock, envelopes, scissors, pens, paper, markers, ribbon, straight cutter, hole punch, cutting board, Exacto knife, glue stick and…. lots and lots of coffee.
I love the look of a lined envelope–it just adds so much to the invitation. Here is how I line my envelopes:
1) Print off a design on an entire sheet of paper –or, hey, save some ink and use some of your left over scrapbook paper, newspaper, magazine paper (you get the idea).
2) Outline a template on the paper and cut out. If you are using Paper Source envelopes then you might be interested to know that they have templates that they sell for most of their envelope sizes. If you are using another type of envelope you can create your own liner template. Check out this tutorial and templates for creating your own envelope liner templates.
3) You don’t need to glue the entire liner to the envelope. I find that using a simple glue stick on the flap of BOTH the liner and envelope holds the whole thing just fine.
4) Now repeat, repeat, repeat. Great huh?
The rest of the invitation:
1) Print out as many of the designs that will fit on the paper as possible. No sense in wasting!
2) Cut out everything you need and gather together neatly (I promise this step helps a lot in the long run).
3) Using an assembly method attach each part of the invitation with care.
4) Pay attention to the small details– your guests will appreciate the extra effort. I like putting notches in the ribbons I put on my invites.
Lastly, make sure that the invitations continue to look great by writing or affixing addresses to the envelopes before stuffing them.
Have fun making the first impression of your party!
Reader’s Question: What supplies do you like to use when creating invitations?


