Category

Holidays

Category

12 Days of Christmas DIYs // A Well Crafted Party

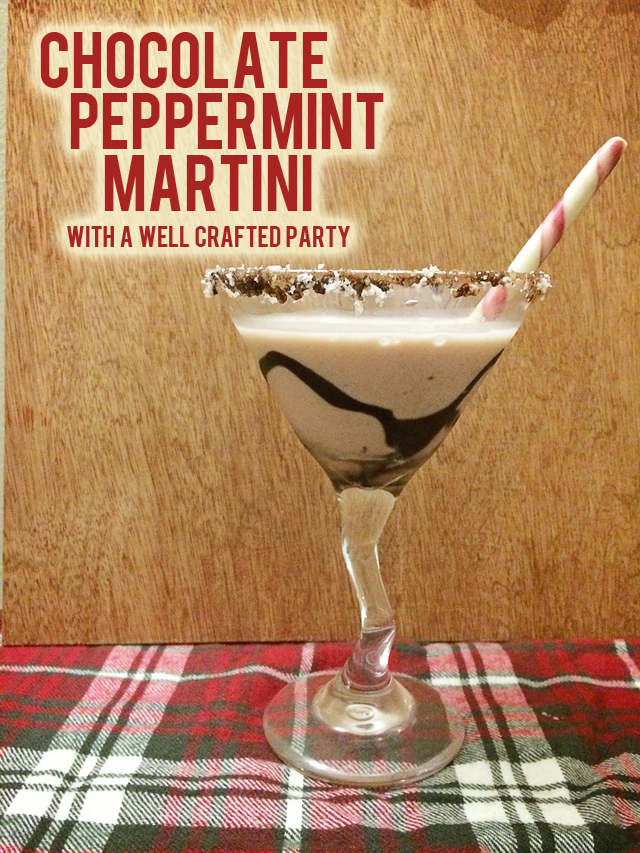
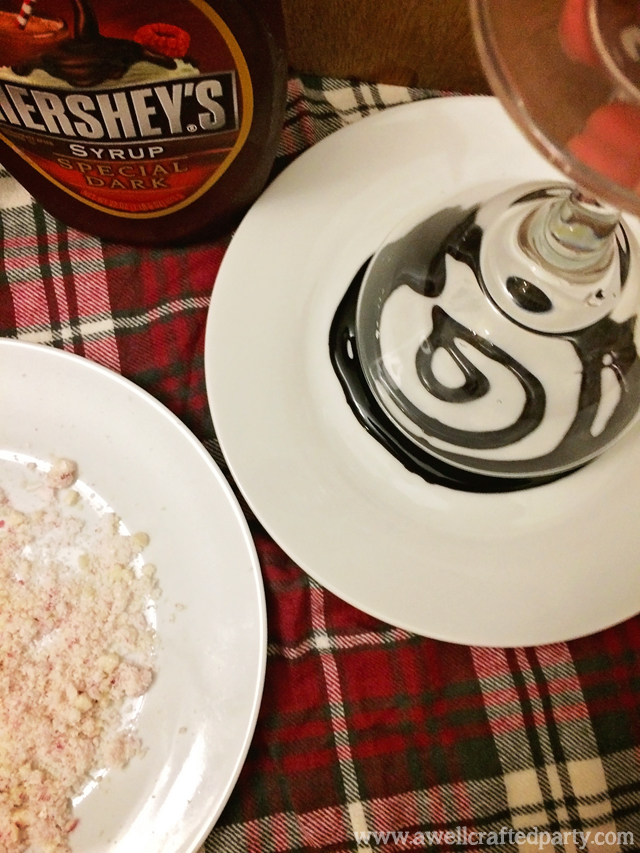
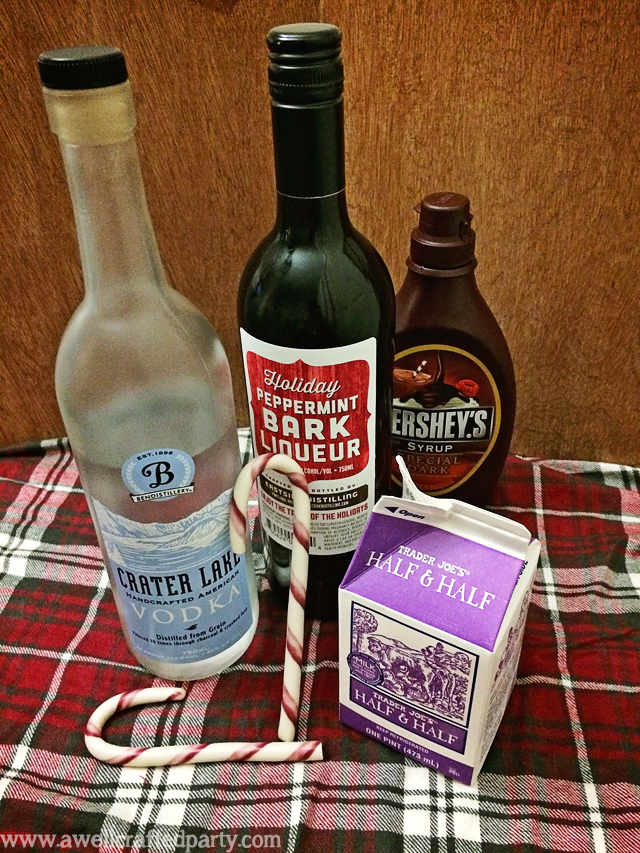
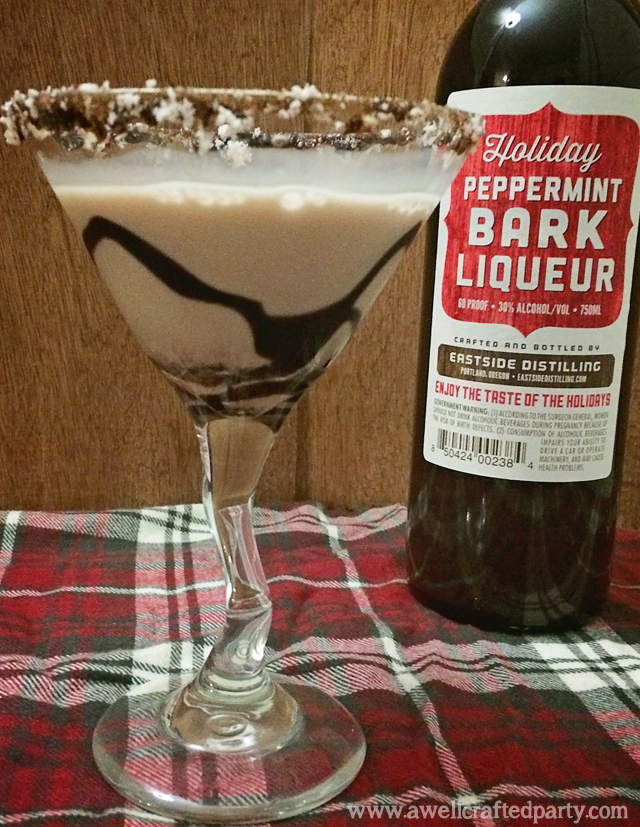
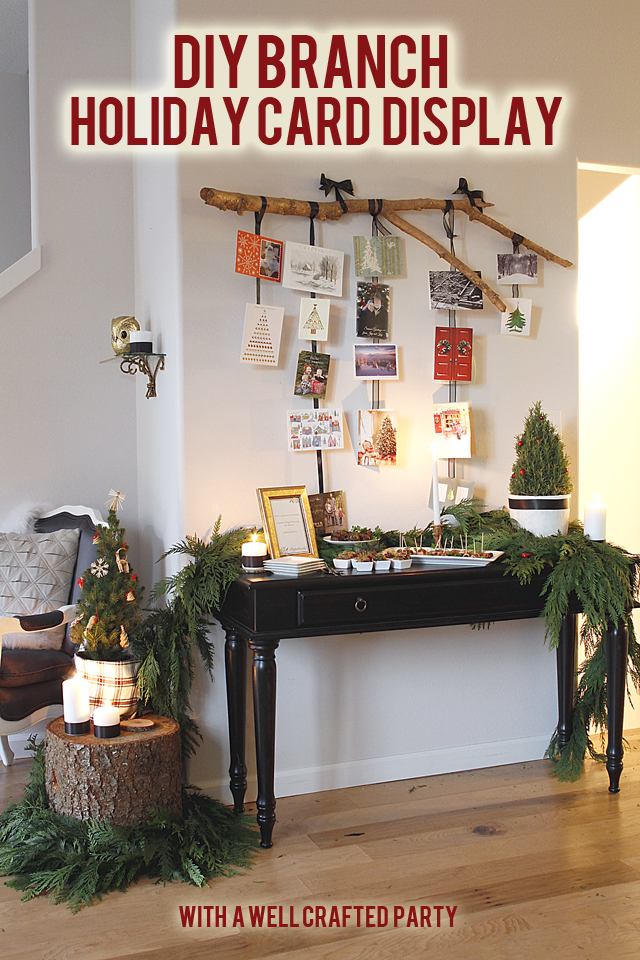
This post is the seventh in my series of the 12 Days of Christmas DIYs for A Well Crafted Party. Check in each day for the next 12 Days for new DIY posts. There will be LOTS of free printables to boot! (Check out yesterday’s post: “Saturday Spirits: Chocolate Peppermint Martini & DIY Candycane Rimming Sugar


Holiday Potluck Free Downloads & Printables // A Well Crafted Party

I love, love, love a good paper invitation. However, I’m just like every other busy person out there and sometimes don’t get around to sending the invitations in time and need to get out an evite or Facebook invitation instead. I’d even say that a Facebook inviation is a handy way to enage with guests prior to a party even if you DO send a paper inviation. Gather RSVPs, post sneak peeks, inform guests about parking… you get the idea!

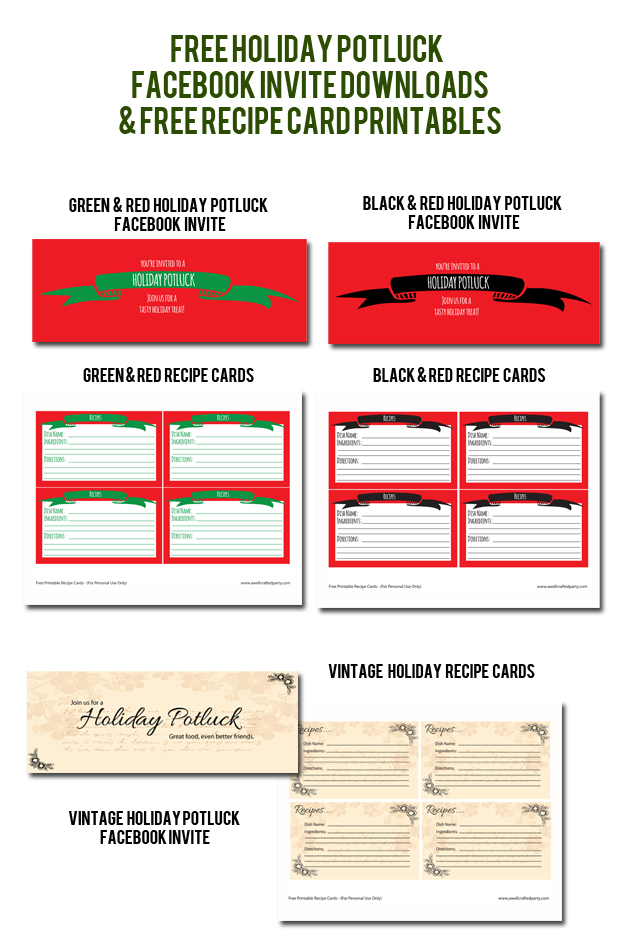
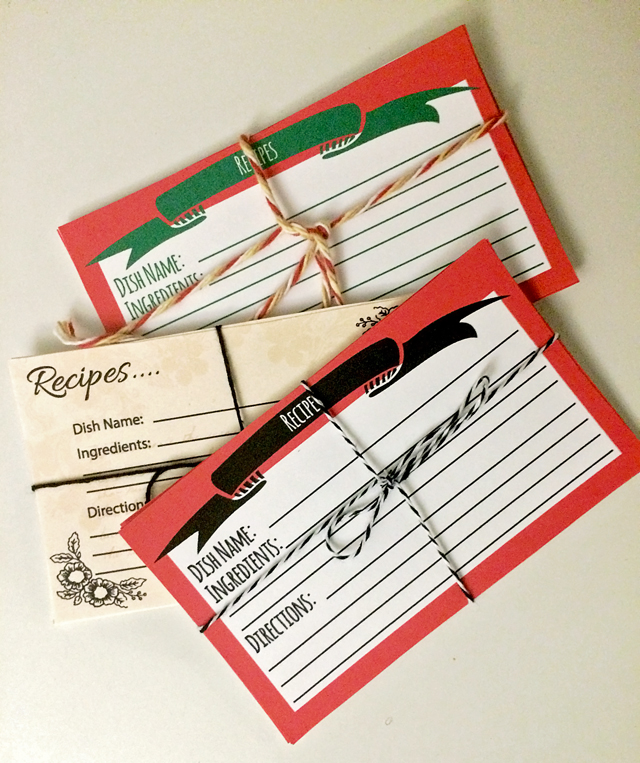
I created a few different versions of holiday potluck invitations and printable recipe cards.

Holiday Potluck Facebook Download // A Well Crafted Party

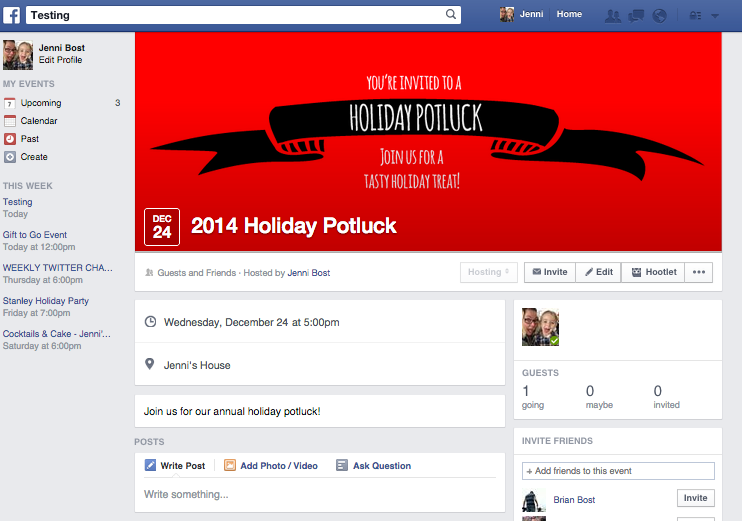
For the Facebook invite cover photo you simply need to download the image of choice by clicking the link of choice. Then upload it into the invite cover photo area following the steps through Facebook.

Printable Recipe Cards // A Well Crafted Party


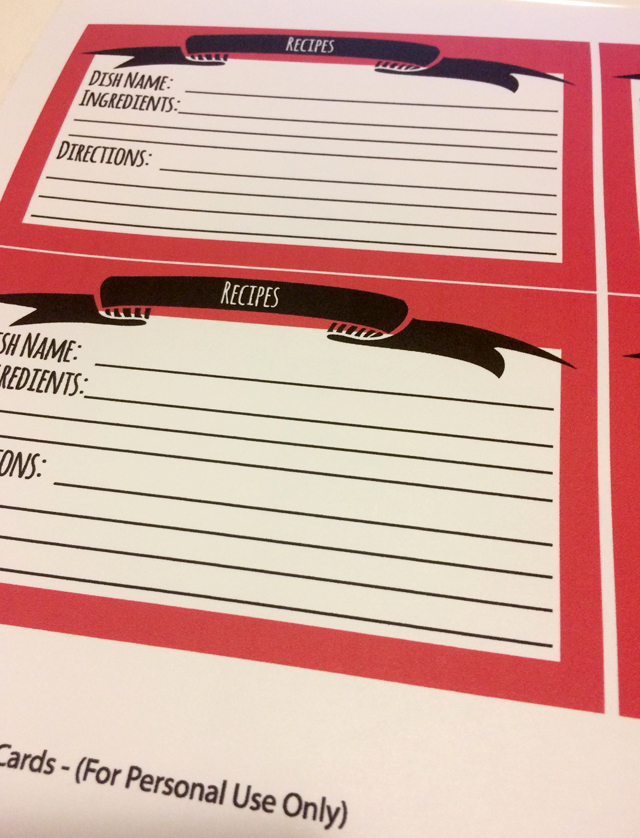
The printable recipe cards are great for having at your potluck party for guests to share their recipes on or to give out as favors at the end of the party. You may even want to print off a set of 12 cards and wrapped them in baker’s twine for a cute and inexpensive hostess gift! Simply download the printable of your choice by selecting a link below and saving to your computer. Print in full color on white cardstock and cut out!

Free Printable Recipe Cards // A Well Crafted Party

Free Downloads:

These printables and downloads are created for personal use only at no cost to you. If you like these downloads I’d appreciate you sharing with friends via Pinterest, Facebook or Twitter!

12 Days of Christmas DIYs // A Well Crafted Party

This post is the sixth in my series of the 12 Days of Christmas DIYs for A Well Crafted Party. Check in each day for the next 12 Days for new DIY posts. There will be LOTS of free printables to boot! (Check out yesterday’s post: “DIY Branch Holiday Card Display“)


Chocolate Peppermint Martini // A Well Crafted Party

Chocolate Peppermint Cocktail

Anyone else a little obsessed with the chocolate-peppermint combo during the holiday season? No, just me? Well, I’ll take two of these then…

Last week I was wondering around the Clackamas Town Center (aka The Mall) and ran across the most amazing thing in the whole world. There is a East Side Distilling storefront IN THE MALL. Can I tell you how much better holiday shopping is after tasting some Burnside Bourbon? SO much better. One of my discoveries while there was a delicious Holiday Peppermint Bark Liqueur. Chocolate. Peppermint. Liqueur.

As soon as I bought it I thought of re-doing a nice chocolate martini to make this tasty rendition. But, first… my DIY for today!

DIY Peppermint Rimming Sugar // A Well Crafted Party

DIY Peppermint Cocktail Rimmer

I love a good rimmer. Bud um dum.

This candycane sugar rimmer is super easy to make. You can rim your martini glasses or hot cocoa mugs by simply dipping the glass into chocolate sauce and then dipping it into the sugar. If you don’t want the glass to have the chocolate on the rim (it does look a little messy) then you can dip it into simple syrup and then into the rimming sugar.

Ingredients:

  • 1/4 cup granulated sugar
  • 2 Candy Canes

Directions (with a food processor):

  1. Put all into a food processor and process until similar sized grains.
  2. Put onto a plate for rimming!

Directions (without food processor):

  1. Put candy canes and sugar into a ziplock bag. Double bag it. Hit with a hammer or meat mallet until all of the candy canes are broken into small bits. Mix well.
  2. Put onto a plate for rimming!

Note: I used organic candy canes and they stuck together quite a lot… it still worked wonderfully, but need to be broken up with a fork if you store it at all. Store in an airtight container or baggy.

Chocolate Peppermint Martini // A Well Crafted Party

Chocolate Peppermint Martini

Ingredients:

  • 1 oz of Holiday Peppermint Bark Liqueur by Eastside Distilling
  • 1 3/4 oz of Vodka
  • 2 oz of Half & Half
  • Dark Chocolate Syrup
  • Shaker with ice
  • Peppermint Cocktail Rimmer

Directions:

  1. Take your martini glass and rim with chocolate syrup and peppermint cocktail rimmer.
  2. Swirl chocolate syrup around the inside of your glass.
  3. In a shaker pour the Peppermint Bark Liqueur, Vodka, and Half & Half over ice. Shake well.
  4. Strain into the martini glass.

You can garnish with a little candy cane and enjoy!

Chocolate Peppermint Martini // A Well Crafted Party

This post was not sponsored. I really did find this stuff in a MALL. And, I will be going back… soon!

12 Days of Christmas DIYs // A Well Crafted Party

This post is the forth in my series of the 12 Days of Christmas DIYs for A Well Crafted Party. Check in each day for the next 12 Days for new DIY posts. There will be LOTS of free printables to boot! (Check out yesterday’s post: “DIY Wood Chargers“)


DIY Holiday Card Display // A Well Crafted Party

I love receiving (and sending) holiday cards. The problem is figuring out where to put said cards each year. Sometimes I display them on a cabinet. Other times of fridge gest covered. This year, I’m displaying them more promenitely… giving them the attention they deserve! This do-it-yourself project is super simple… the hardest part involves finding a branch!

DIY Branch Holiday Photo Holder Supplies:

(Affiliate Links Below)

How to Make a Branch Holiday Card Display // A Well Crafted Party

How to make a Gilded Branch Holiday Photo Display:

1. Find a branch! This might be the hardest and easiest part of this whole ordeal. Before I lived in my house with a gigantic tree out in the yard I wouldn’t have been able to tell you where to find a branch. This branch literally fell into our yard after a big wind storm. Other ways to find a branch besides waiting on mother nature include trimming a tree or finding tree pieces ready to go out with the garbage. Please note that you should either be doing these things with your own trees or asking first… otherwise it might be a little difficult to explain to future employers that you got arrested for trying to make a holiday card display.

2. Trim off small branches and foliage. Our branch fell from a very large and old evergreen tree. It was covered in pine needles. My husband so graciously took the time to take off the offshoots for me, leaving me with a bare branch. (It is completely easy enough to do yourself, I just happen to be allergic!)

3. Sand down stumpy parts and dangerous edges. Don’t want to get splinters when putting up your holiday cards!

4. Spray paint! This is the fun part. You can totally leave your branch bare if you’d like… you can even take the bark off and sand down the branch for a beautiful bare branch look. I wanted my card holder to be gilded though! So, I sprayed the branch with the Copper Metallic spray paint until it had a pretty sheen. After drying I did a layer of clear sealer to try to prevent the paint scuffing off. (I should have probably done two layers as some of the paint scuffed up my friend’s walls during this photoshoot. EEK.)

5. Mount your branch. For this photoshoot we actaully just tied ribbons around the branch and nailed the ribbon to the wall. This is not the most sturdy solution. For day to day use I’d actually suggest mounting curtain brackets and placing the branch in those. You’d have to find brackets large enough to fit your branch, and then secure the branch by tighting the brackets around it. I like using the Ikea brackets on my wall throughout the year and changing out wall hangings for parties!

6. Hang ribbons on the branch to attach your holiday cards. Use a slip knot to tie on your ribbon. That way, at the end of the holiday you can easily pack away your branch. (Check out my ribbon backdrop wall for pictures of ribbons with slipknots!)

7. Hang your cards! As you receive your holiday cards and photos secure them to the backdrop using a paperclip, staple or glue dot!

 More Holiday Goodies:

Do you want to see more from this Holiday Styled Shoot?

Photos from this project was from a recent Holiday Styled Shoot collaboration between myself and Suzannah of Create/Enjoy and Macey from Motormouth Studio. Check out my main post with links to DIY projects & recipes: “Natural Green and White Holiday Party + Free Printables” A big thank you to Orchard Supply Hardware for providing a couple of the supplies to make this DIY happen!