Category

Party Food

Category

12 Days of Christmas DIYs // A Well Crafted Party

This post is the second in my series of the 12 Days of Christmas DIYs for A Well Crafted Party. Check in each day for the next 12 Days for new DIY posts. There will be LOTS of free printables to boot! (Check out yesterday’s post: “Natural Green & White Holiday Party + Free Printables“)


Festive Holiday Drink Garnish // A Well Crafted Party

A good garnish will take a simple boring beverage (take, water for instance) and make it something special. I like most of my garnishes to be simple to make, because who has time to spend on creating intricate and fussy drink garnishes? Not me!

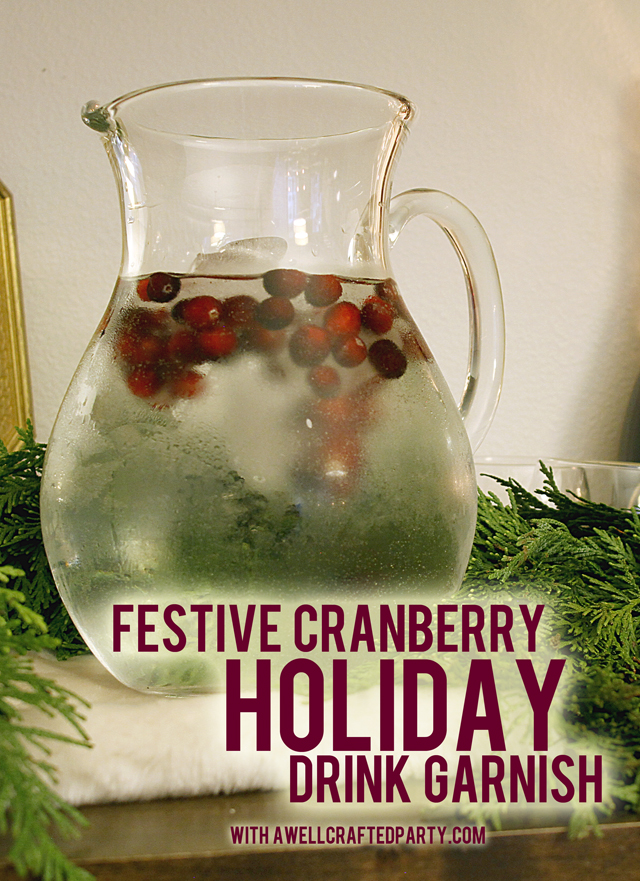
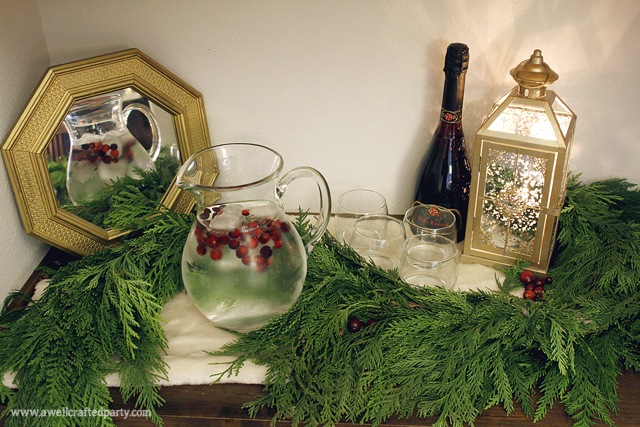
Festive Holiday Drink Garnish with Cranberries

To make your water glass pop or to give a festive twist to a Vodka and Soda on the rocks, try adding cranberries to your ice-cube tray and making cranberry ice.

Cranberry Ice Instructions // A Well Crafted Party

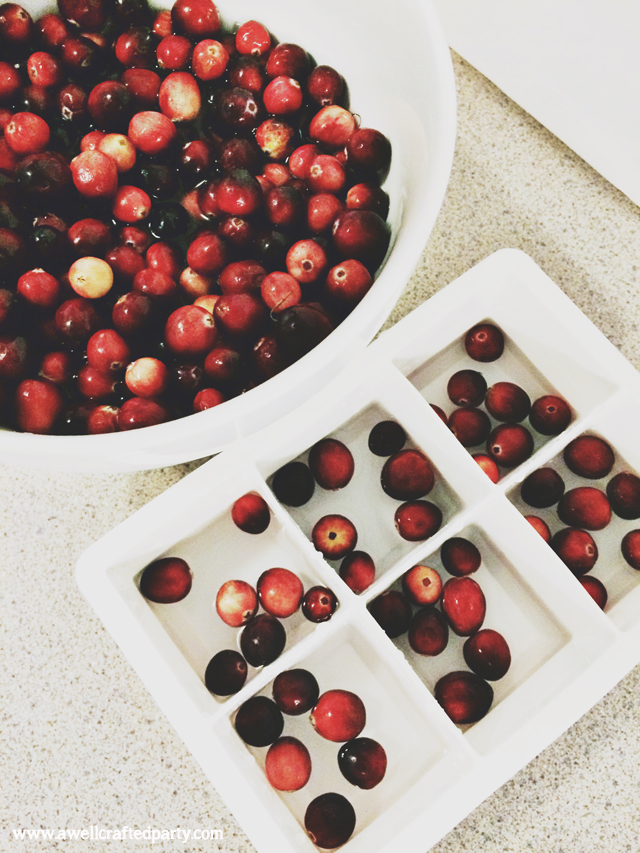
There is actually one or two steps in this ultra-easy DIY because cranberries will float the the top of your ice cubes and look pretty silly in your drink unless you take the time to freeze in steps. Why not just throw cranberries in a pitcher? They’ll all float to the top! The ice cubes will float as well, but it will look more evenly distributed throughout the pitcher.

Cranberry Ice Cube DIY // A Well Crafted Party

Directions for making cranberry filled ice cubes:

  1. Using distilled water or previously boiled water (freezes more clearly than tap water) fill your ice cube tray about 1/4 of the way full.
  2. Drop in a handful of cranberries in each cube area.
  3. Freeze (you don’t need to freeze overnight, but you do want the ice cubes to be solid before adding more water or partial cubes will float up.)
  4. After freezing add more water (fill until the cubes are 3/4 full, leaving a little space for more water) and cranberries. Freeze again.
  5. Finally, fill with just water so that the cranberries are entirely covered.

This doesn’t need to be perfect. I had a few cubes where I didn’t layer quite right and the berries poked out of the bottom a bit. It still looked festive in the water pitcher!

Cranberry Drink Garnish DIY // A Well Crafted Party

Need an ice-cube tray?

(affiliate links)

When discussing this DIY project with someone else I found out that not everyone has ice cube trays! Some people have super cool machines that will MAKE ice for them! (AMAZING.) But, you will need ice cube trays to make this project work. I like the idea of trying out the large cube trays (like the ones in the above picture) or a spherical tray to make a festive ice ball!

Do you want to see more from this Holiday Styled Shoot?

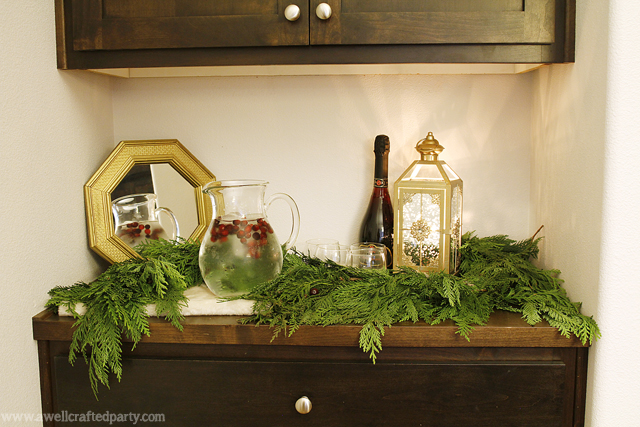
Photos from this project was from a recent Holiday Styled Shoot collaboration between myself and Suzannah of Create/Enjoy and Macey from Motormouth Studio. Check out my main post with links to DIY projects & recipes: “Natural Green and White Holiday Party + Free Printables”


Wow! It has been a couple weeks since I’ve last shared a Saturday Spirits. I didn’t quite mean to go on a hiatus… but, it happened. Anywho, I’m bringing you one awesome cocktail today, so the wait will have been worth it. A few weeks ago I created these Lollipop Sparkling Cocktails for my “Hey Girl-Ryan Gosling Themed Birthday Party.

Sparkling Lollipop Cocktail // A Well Crafted Party

First I made lollipops using Raft Botanical Cocktail and Soda Syrups for the flavoring. This was my first successful time making candy… and, boy it is fun, easy and TASTY. I discovered that patience really was the key to making candy right. Well, that and a candy thermometer.

Once your lollipops are done the hard part of this cocktail is completed. All that is left is creating a tasty rimming sugar and pouring your favorite sparkling wine! These make for a really festive cocktail. There are quite a few recipes and how to’s below. Don’t let them intimidate you. The whole process is much easier than it sounds when you look at a huge blog post.

Sparkling Lollipop Cocktails // A Well Crafted Party

How to Make Lollipops

To make lollipops you just need a few essential tools. I made my lollipops with molds because I wanted to have a very precise look to them. However, you could use this powdered sugar method as well! For flavoring I really wanted to avoid using artificial or concentrated flavoring. I opted to test out creating the pops out of my Raft cocktail syrups and was thrilled with the way they turned out. (Affiliate Links Below)

Tools: 

Ingredients: 

  • 2 Cups Sugar
  • 2 Tablespoons Corn Syrup
  • 1 3/4 Cup Water
  • 3 Tablespoons Raft Botanical Cocktail Syrup (I used Lemon Ginger for one set & Hibiscus Lavender for another)
  • Extra sugar and syrup to create rimming sugar

Directions: 

  1. Prep your candy molds by spraying with vegetable oil (non flavored!) and placing the lollipop sticks.
  2. In a saucepan combine sugar, corn syrup and water over medium to medium-high heat. Stir to keep it from overheating or sticking. Burnt sugar will quickly make happy candy-making time into throwing out a pan and dealing with a stench time.
  3. Heat the sugar, stirring, until the candy thermometer reads just about 305 degrees. You don’t need to keep the candy thermometer in there the entire time, but once it starts to boil a bit it is a good idea to get that in there. You don’t want it to get past the hard-candy stage. Once the thermometer reads 305 go ahead and add in the Raft syrup. Stir into the mixture and watch the thermometer closely.
  4. Once the thermometer reads between 310-320 degrees remove the mixture from the heat. using a spoon pour the mixture into the molds. Be very careful… liquid candy burns are not a pretty thing. You’ll want to do this part while the mixture is hot, I recommend buying several lollipop molds. I ended up making about 24 lollipops per batch.
  5. Once the candy has cooled the lollipops are ready to eat! We stored ours on wax paper in a sealed container for about 2 weeks and they still tasted awesome. Though, try to keep them separated as they will stick together. You can also just buy some candy wraps and wrap them up nicely!

Sparkling Lollipop Cocktail // A Well Crafted Party

How to Make Rimming Sugar

A good sparkling cocktail needs some sugar to it. The lollipop will give the cocktail sugar and flavor… but, it won’t be immediate. The rimming sugar helps drive the flavor until the lollipop can do its magic. It also looks pretty too!

Ingredients:

  • 1/2 cup Granulated sugar
  • 1- 2 teaspoons Raft Syrup
  • Lemon zest (use a microplane and it takes no time at all!)

Directions:

  1. Mix ingredients well… breaking up any clumps that might have formed from the liquid
  2. Lay out flat on a plate or baking sheet until mixture has totally dried. It can then be stored in an airtight container for about a week or so.

Sparkling Lollipop Cocktail // A Well Crafted Party

Lollipop Sparkling Cocktail Recipe

Ingredients:

Directions:

  1. Use the lemon wedge to ring around the glass and dip onto a plate with rimming sugar.
  2. Drop a lollipop into the glass
  3. Pour in the sparkling wine!
  4. If you’d like a little more kick then add in 3/4 oz of Limoncello Liqueur

Fruits de Mer // A well Crafted Party

Fruits de Mer is a seafood platter of raw and/or cooked shellfish usually served on a bed of ice. A long time ago I saw a beautiful fruits de mer platter in one of my favorite events books and have wanted to throw a party with a fruits of the sea platter.

Right before my Mohs Surgery to remove my skin cancer I really needed a good excuse to be distracted for the evening. I invited friends over for a big meal and made the above platter as an appetizer… boy, let me tell you. We didn’t need the meal! I actually made enough seafood for TWO of these large platters. Then we followed it up with steaks and veggies for dinner and then something for dessert. I’ve never been so full in my life!

Making this platter was much less intimidating than I originally thought. I used precooked crab and lobster… it would be even better with fresh shell fish, but it wasn’t readily available in my area. The whole thing was still delicious, but someday I plan to make it with all fresh shellfish. I’d also like to pair it with ceviche someday! YUM. Below is how I made this dish… know that it is completely easy to customize this dish to your cooking comfort level and your tastes. If you go to a great fish purveyor you can even asked for your lobster to be steamed and your oysters shucked… then there is NO work for you and your guests are completely wow’d!

Fruits de Mer // A well Crafted Party

Plateau de Fruits de Mer:

Great appetizer for a dinner party or can even be served as hors d’oeuvres at a cocktail party. One large platter will serve 4 easily. I served this dish with a tarter sauce, cocktail sauce, chile lime sauce and butter.

To Build Platter (Just Like Above):

Cooking directions below this list!

  • Ice: Cover a large platter or bowl with ice.
  • Crab Legs: Add cooked and cooled crab legs to platter.  It is also helpful to go ahead and pre-crack the crab legs so it is easy for your guests to take out the meat.
  • Lobster claws: I was fortunate enough to find lobster claws already cut and pre-cracked for me! While I believe fresh lobster would have been even more amazing… the convenience of these little suckers was too good to pass up! I did go ahead and boil them quickly in a flavorful broth (see below) and then cooled quickly before placing on the platter.
  • Shrimp: I got the largest sized raw, shell on (deveined) shrimp. After cooking I peeled the shrimp and placed on the platter. Easy peasy!
  • Oysters: I spent all day looking up how to shuck oysters. I’d been SO excited about shucking oysters. However, the whole foods that these puppies came from cleaned and shucked them for me! I just got them same day and kept them on ice until serving! So, no directions below on how to shuck oysters… but, check out this oyster shucking resource if you’re in the mood to get your shuck on!
  • Cucumbers filled with spicy salmon: This was a creation of my own. They turned out pretty good… though, next time I’ll go with a sashimi grade salmon rather than cooking my salmon first.


Cooking Directions:

Crab, Lobster, and Shrimp:

  1. Get a large ice bath prepared and put to the side.
  2. In a large pot bring 2 gallons of water, 1 pint vegetable stock, 3 Bay Leaves, a Tablespoon of black peppercorns, and 1/2 bottle of dry white wine to boil.
  3. In batches cook the seafood. If cooking from live you want to do about 10 minutes for your lobster and crab. Move directly to ice bath once finished. For pre-steamed crab and lobster you’ll be infusing the shellfish with flavor and heating it back up to temp for about 8 minutes. Transfer to the ice bath. Finally, cook the shrimp. The shrimp will be dense and pink in about 3 minutes. Transfer shrimp to ice bath. Peel once cooled. Bring the liquid to a boil again between each batch.

Cucumbers filled with spicy salmon:

Ingredients:

  • two cucumbers, cut into 1 to 1 1/2 inch portions
  • 10 oz of cooked salmon shredded (or, use sashimi grade salmon diced!)
  • 1 Tablespoon Siracha
  • 1 Tablespoon of Mayo (I used kewpie mayonaise)
  • Juice of one lime
  • Sprinkle of cilantro for garnish

Directions:

  1. Using a melon baller or spoon take out most of the center of the cucumber portion. Leave a little on the bottom to hold in the filling.
  2. Mix the salmon, siracha, mayo, and lime juice together in a bowl.
  3. Fill the cucumber portions with mixture.
  4. Sprinkle on the cilantro and enjoy!


What would you think if you went to a party and saw a Fruits De Mer? Would you ever try one at your own dinner table?