Step Two:
Tie fabric strips onto chicken wire skipping some of the holes so that the fabric lays nicely.
It might be a little late to post this… but, I wanted to get it out here.
So, if you like it bookmark it for next year’s holiday decorating!
But, before I begin with this year’s Christmas tree I wanted to let you in on the Christmas Trees of Jenni’s past. I love the idea of a perfectly trimmed Christmas tree. My first year as a married lady I went all out with our tree and decorated everything in pretty golds and reds. We had a plastic tree then and I spent a fortune getting pretty garlands and ornaments to decorate the house for the holiday.
It was a beautiful holiday. *Sigh*
Six months later when planning our move to Oregon
we decided to get rid of the tree (among other things). So, we got to buy my very first REAL TREE!
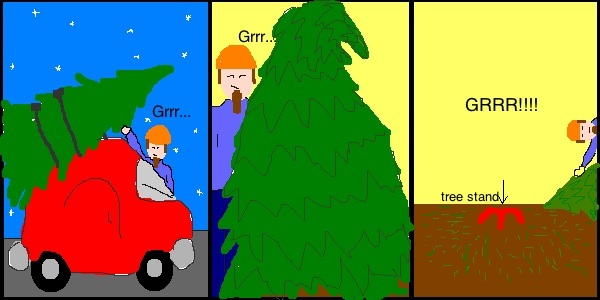
We got it for a steal because we always wait til Dec. 13 to put up the tree. I was so very excited picking out the tree and dreaming of all the pretty things I was going to do with it. My husband on the other hand did not enjoy the process near as much. I drew a picture for you so you can see what he went through.
Brian didn’t like putting the tree on the car. He also wasn’t very happy when we discovered that we bought a tree that was six feet around and nine feet tall… real trimming of the tree was needed.
And, while he enjoyed the tree while it was up he really didn’t like it when it was time to take to get recycled. Needless to say he nixed the real tree idea for the following years.
The next two years we decided to not have a tree at all…. we instead decorated the house using items we already had and put up a couple of “little” trees.
It looked something like this (including the sad faces missing the tree):
It was slightly prettier in real life though:
So, to avoid sad faces, real trees or plastic trees that take up space year round…
I needed a new idea for this year.
That is when I saw this at a local Anthropologie:
Image via The Little Things We Do
And, of course I had to try it!
So, while I didn’t take photos of each step I did want to put up a small tutorial on how to make your own fabric Christmas tree.
Supplies:
—Chicken Wire (we got 9 feet of it but could have used a little more probably)
—Lots and Lots of fabric cut into 2 inch by 12 inch strips (I ended up using about 10 yards)
—A large stick and a bucket to use as a base for the tree. Fill the bucket with heavy items like rocks and tape the stick in place. I think you could also use other items to serve as the base of the tree…. the chicken wire does a lot of standing up on its own. We used a small trash can and the cardboard roll from a large spool of fabric.
Step One:
Create a cone like shape out of your chicken wire. This is not an easy process. It takes some time and you might get scratched. Sorry.
Keep going…
Step Three:
Wrap lights around tree and add fun ornaments. I added fabric flowers. 🙂
The Final Product:
I think the tree looks slightly like something out of a Dr. Seuss book!
Close up:


1 Comment
This is the cutest, craftiest tree ever!!!