I love re-purposing items to use in my parties. One of the items that I really like to use in my parties are PICTURE FRAMES! They come in all kinds of fabulous shapes and sizes and can be used in so many different ways. You can use tiny ones on tables to mark place settings or extremely large ones as props in your home photobooth.
So, I thought I’d bring a DIY project using these wonderful multi-use props. Read on to find TWO fun uses for picture frames.
Prepping Your Frame
First things first…you’ve got to prep your frame to work in your party vision. If you’ve already purchased a frame that works in your vision then fantastic… just skip this step. But, if you’re like me and don’t like to spend a TON of money on party projects then read on. I typically purchase frames at Goodwill or a dollar store. Other fun affordable frames can be found at places like Ikea or Target.
Painting your frame in a color that matches your party’s color scheme is the EASIEST way to make it work in your party. I typically grab a handy can of spray paint for this but, you can use acrylic paint or even Modge Podge it and dump glitter all over it.
Project #1: Framed Sign
This project is the easiest way to really bring attention to certain elements of your party. I like to make signs for all of the major areas of my parties: Bar, Dessert Buffet, Photo Booth… etc.
Tools: Prepped frame of any size… I really like using either 5X7 or 8X10 frames and a sign for the area of choice
Directions: Create signs (or, find some awesome FREE PRINTABLES on-line) and print! You could also hand stencil signs or use your calligraphy talents if you have them! Cut to a size that fits your chosen frame. Then, frame the sign and place in the selected area of your party.
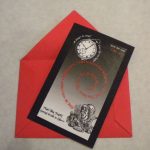
Project #2: Drink or Appetizer Tray
A fun way to put in a whimsical, special detail into a party is using everyday objects in surprising ways. Using a picture frame as a tray gives you the opportunity to personalize drink areas or make passed hors d’oeuvres extra special.
Tools: Prepped frame of at least 8X10 size or larger, fabric or decorative paper, any extra embellishments you might add (I’m using plastic spiders and rhinestones!), a glue if you are adding embellishments
Directions: Take your prepped frame and slide a decorative paper in the frame. Replace the back of the frame with cardboard OR tape down the prop tool on the back of the frame so that the back is completely flat. Add embellishments to frame in an eye catching way. Place frame on side tables, buffets or in your hands for drinks or hors d’oeuvres!
Hope you got a few ideas from this post! Don’t forget to enter our giveaway for a full “Well Crafted Party” Package! See the link on the right or just CLICK HERE.
And by the by… this post is being entered in the:


3 Comments
Great ideas!
I love that tray! so cool!
I’m lovin’ these frames!! So cool.